Showing posts with label The Paper Nest Dolls. Show all posts

Friday, 3 June 2016

Feeling happy

Hello lovely people,

Things I am happy about today;

1)  I have had an utterly amazing 38 day holiday in America but am actually happy to be home again to sleep in my own bed and catch up with all my friends and family

2) I passed my course and am now a Pharmacist Independent Prescriber (so I can prescribe medicines just like a doctor!)

3)  It has been sunny today so I was able to do a little tidying in the garden; still LOTS more to be done though!

4)  While I was away, this happened...


I had to sit on this news for ages and then I was unable to get my hands on the actual magazine until I got back to the UK so I am super excited to finally share it with you.

I even got a little bit of my colouring on the cover!


I thought I'd share all 3 cards at once rather than spread them out but I won't do all the extra shots with close ups and details as this post would be unbelievably long if I did, and I kept the cards fairly simple anyway to show off the images.

 #1 - my favourite card of the trio :-)

Trio of Summer cards for Making Cards magazine feature (Sand castle Ellie by The Paper Nest Dolls)

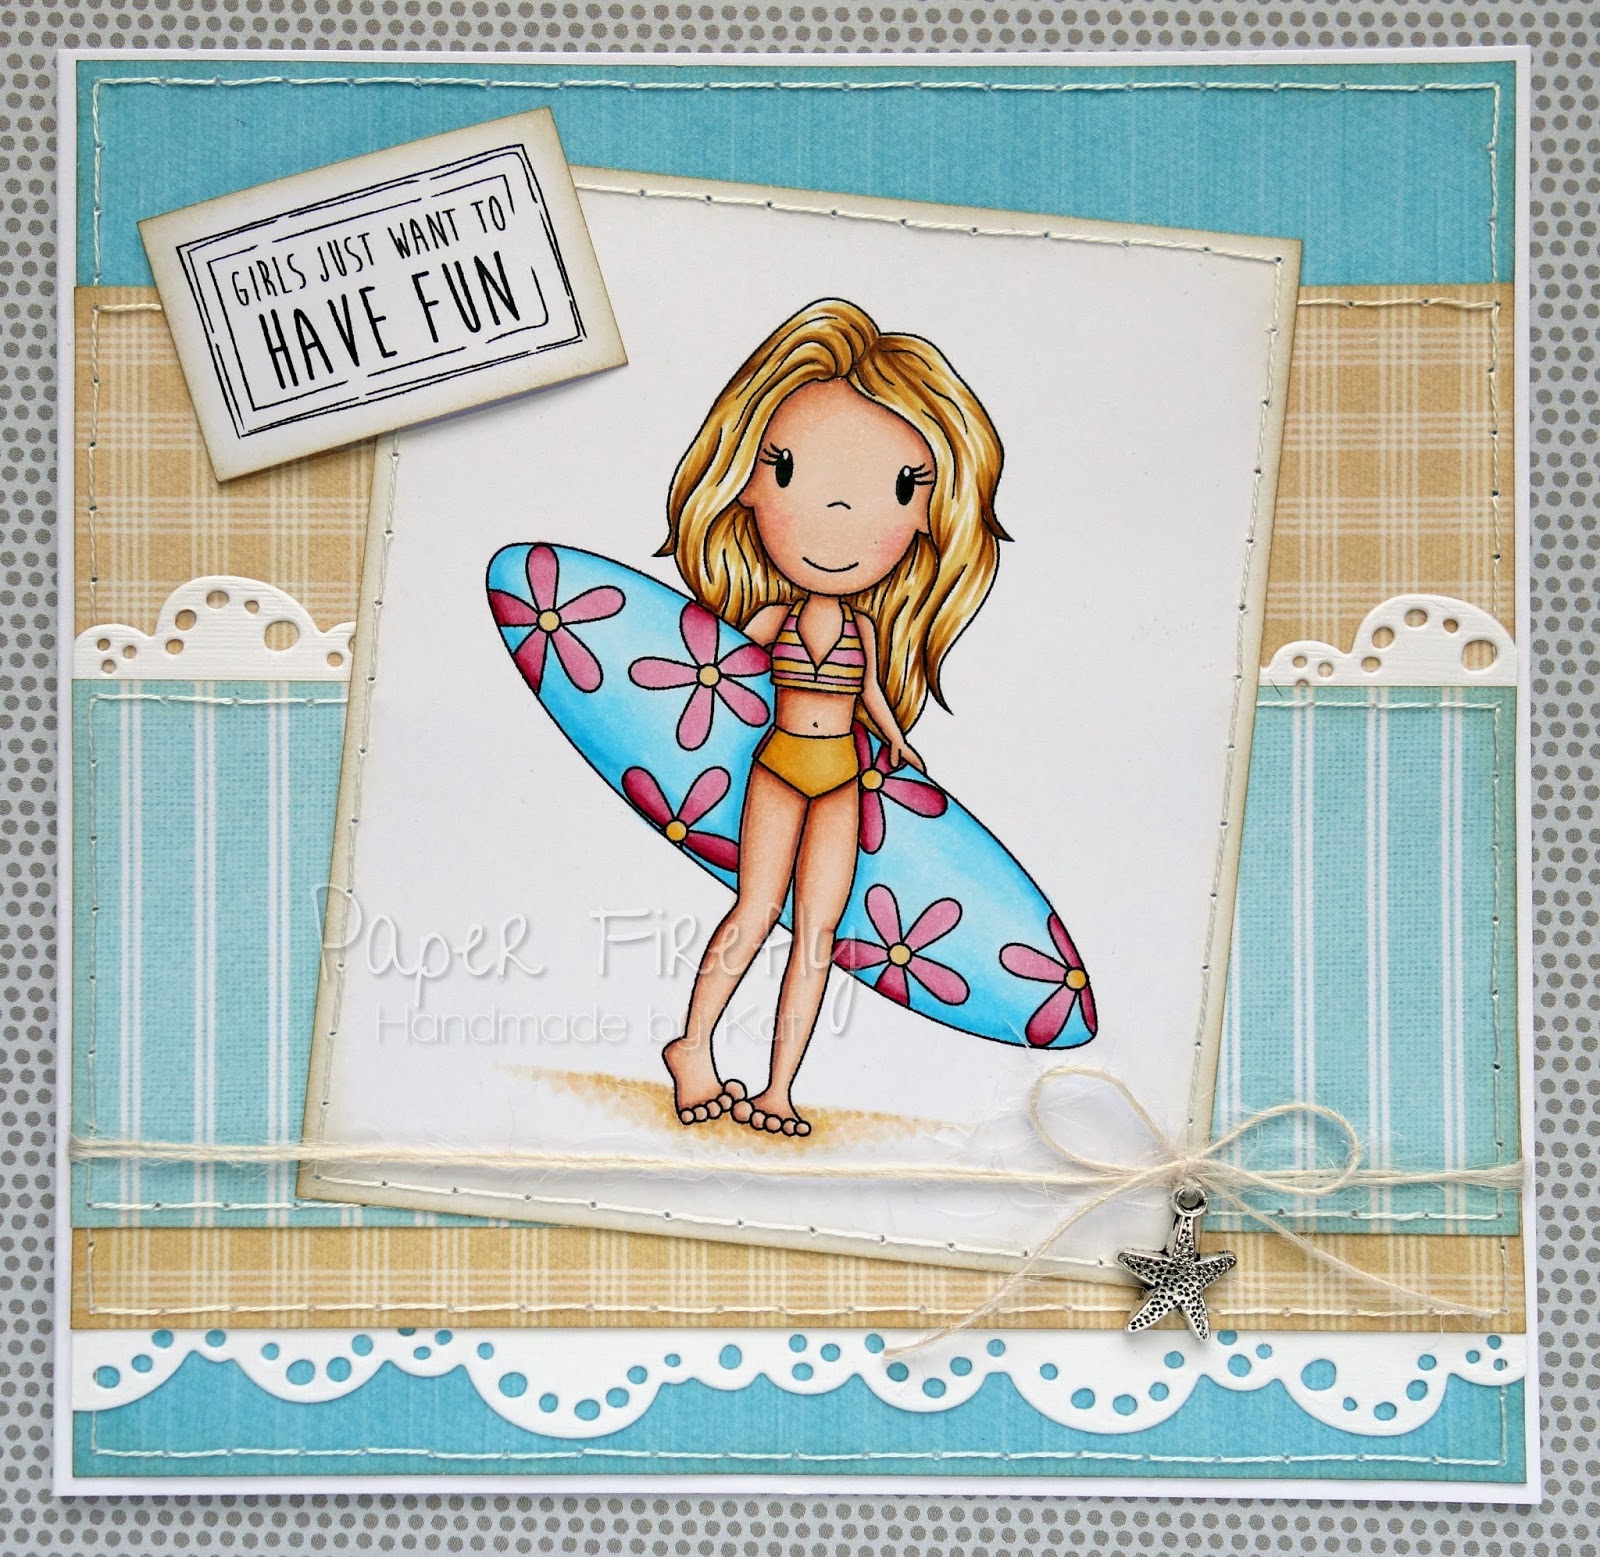
#2 - that sentiment is so true!

Trio of Summer cards for Making Cards magazine feature (Surfer Avery by The Paper Nest Dolls)

#3 - yum yum...anyone fancy ice cream now?!

Trio of Summer cards for Making Cards magazine feature (Ice cream Ellie by The Paper Nest Dolls)

Card recipes;
DP: Country meadow, Pastel dreams, and Bonnets and bowties (solids) - all from Nitwit Collections
Dies: Tilda lace - Magnolia Doohickeys
Charms: Shell mix - The Hobby House
Sentiments: various from stash

Copic colours;
Skin: E000/00/21/11/04 & R20
Hair (ice cream): E11/15/18
Hair (sandcastle): E53/35/59
Hair (surfer): Y21/YR23/E35
Turquoise bits: BG000/01/02
Pink bits: R81/83/85
Yellow bits: Y23/35/YR23
Sand: YR30/E50/E51/YR31/E53
Water: BG0000/000
Shell: E41/423/43
Stick: E55/57
Ice cream cone: E50/51/53

I hope you have all had a beautiful day, sunny or otherwise!

Thanks for visiting and I really appreciate any comments that you leave,

Thursday, 5 May 2016

Christmas in May?!

Hello lovely people,

It's time for a new challenge at As You Like It and our theme this time is...

YOUR FAVOURITE...PATTERNED OR EMBOSSED PAPER
...and don't forget to tell us why it's your favourite!

Our sponsor this time is All Dressed Up with 2 digi images of the winner's choice


Well this has to be the earliest I have ever made a Christmas card!

I was aiming for a shabby chic / Nordic style for this design so these yummy Maja papers were just the thing and I love how they even include little sentiment strips.

Shabby chic / Nordic style Christmas card with Paper Nest Dolls image

This image is so sweet and I've added a touch of sparkle to the furry details.

Shabby chic / Nordic style Christmas card with Paper Nest Dolls image

I love arranging flowers round a circular image as it's so easy to do and looks so pretty especially with a charm dangling at one end, and this teeny pine cone is pretty darn cute!

Shabby chic / Nordic style Christmas card with Paper Nest Dolls image

Card recipe;
DP: Home for the holidays and A gift for you - Maja Design (available from Live and Love Crafts)
Dies: Circle stax - MFT Die-namics, Big circle dies scalloped edge - Presscut

Copic colours;
Skin: E000/00/21/11/04 & R20
Hair: E41/43/47
Hat / cape / mittens / bow: R27/46/39/59
Dress: W2/3/4
Boots: W5/6/7/8
Furry bits: W00/1 (& Glamour Dust)
Reindeer body / collar: E41/42/43/44
Reindeer light patch on back: E40/41/42
Reindeer hooves / antlers / nose: E43/44
Reindeer ears: R000/00/01
Bells: YR30/31
Ground: W00/0/1/2/3/4

Thanks for visiting and I really appreciate any comments that you leave,


Tuesday, 19 April 2016

Celebrate with a cupcake

Hello lovely people,

If you have been following my countdowns you will know that today is the day I head to Bath to undertake my practical exam for the prescribing course.

Then I have a case presentation to give on Wednesday but I'm not worried about that as its only 10 minutes and I'm quite relaxed about giving presentations.

I'll be fine as long as don't drink a big cup of coffee immediately beforehand as I talk quite fast even without the added caffeine...yes, I have made that mistake before - lol!

Onto the crafting and today I have a Paper Nest Dolls card to share, using a paper pad that I have had for a while and somehow haven't used before.

I thought I would use it for wedding cards but it seemed to suit this image really well and even had the perfect sentiment topper for me to use :-)

Pastel card featuring Cupcake Avery by The Paper Nest Dolls

I think I should treat myself to a cupcake this size after I finish my exams!

Yummy!

Pastel card featuring Cupcake Avery by The Paper Nest Dolls

I felt that this card needed some bunting to complete the celebratory feel so I made my own using co-ordinating paper from the paper pad.
I cut the little flags by hand, folded the top of each flag over a length of twine and glued them down.  I attached it to the card with foam pads on the back of the flags and trimmed the ends of the twine and covered them with flowers.
I do love bunting; it makes me smile :-)

Pastel card featuring Cupcake Avery by The Paper Nest Dolls


Card recipe;
Image: Cupcake Avery - The Paper Nest Dolls
DP: Save the Date - Teresa Collins

Copic colours;
Skin: E000/00/21/11/04 & R20
Hair: E53/35/59
Pale aqua: BG10/11/32
Dark aqua: BG13/15
Pink: R30/32/22
Cupcake frosting: R000/00/30
Ground: W00/0/1/2/3/4

Thanks for visiting and I really appreciate any comments that you leave,


Saturday, 12 March 2016

Cute cowgirl

Hello lovely people,

Happy weekend everyone!
I am going to be enjoying a fairly quiet weekend although I did pop out for a few drinks with friends last night and am having dinner with other friends tonight.

Today I have a Paper Nest Dolls card to share with you and this is one of a whole heap of brand new images that have just been released.

Cowgirl card; image from Paper Nest Dolls, papers by Maja Design


This is Cowgirl Emma and she is pretty cute but I think that little cow is even cuter!
Cowgirl card; image from Paper Nest Dolls, papers by Maja Design

I have to say I am always quite pleased when I make a girly card that doesn't feature pink!
Apart from that teeny heart - lol!

I do love to use twine on my cards and mostly go for button twine but this hemp twine is great for a slightly chunkier and less fluffy feel, which suits this image and card better I think.
Cowgirl card; image from Paper Nest Dolls, papers by Maja Design


Card recipe;
DP: Home for the Holidays - Maja Design (available from Live and Love Crafts)

Copic colours;
Skin: E000/00/21/11/04 & R20
Hair: Y21/YR23/E35
Hat / boots / belt: E23/25/27
Skirt / waistcoat / hat bow: B91/93/97
Shirt: W00/1
Rope: E40/41/42/43
Cow body: W00/1 & E31/33/35
Cow hair: E33/35/27
Cow feet: W0/1/3
Cow nose: R000/00/01
Cow horns: YR30
Ground: W00/0/1/2/3/4

It is the most beautiful sunny day here so Dr. Hubby and I are heading out for a walk before I settle in to do some crafting :-)

I hope you all have a wonderful weekend!

Thanks for visiting and I love reading any comments that you leave,


Saturday, 20 February 2016

Candle Ellie

Hello lovely people,

Woohooo! It's the weekend again and I hope you all have lovely things planned.
I will be crafting and catching up with friends :-)

Today I am sharing another card for The Paper Nest Dolls and no surprises I have gone for a pretty girly design!

Girly birthday card featuring girl with candle (image from Paper Nest Dolls)

I have used a fairly new image that I instantly fell in love with when I saw it.

Just don't get me started on the health and safety issues here...candle...hair...just saying - lol!

On a positive note, if that's the size of the candle, how big must the cake be?!

Girly birthday card featuring girl with candle (image from Paper Nest Dolls)

Card recipe;
DP: Summer crush - Maja Design (available from Live and Love Crafts)
Dies: Tilda lace - Magnolia Doohickeys

Copic colours;
Skin: E000/00/21/11/04 & R20
Hair: E11/15/18
Dress: R20/21/22/24
Dress sash & frill: R0000/00/20
Candle: B52/BG72/75 & R0000/00/20 & YR20/21

Enjoy your weekend!

Thanks for visiting and I really appreciate any comments that you leave,


Wednesday, 10 February 2016

More Dolls!

Hello lovely people,

Today is a wonderful day for 2 reasons;

1)  I am off for a catch up with two lovely crafting blogging friends and I am soooooo looking forward to the coffee, cake and most of all, the company :-)

2)  I am delighted to tell you that Christine of The Paper Nest Dolls asked me to do a few more cards as a guest DT member...cue happy dance!

Today sees the release of a brand new set of images from The Paper Nest Dolls and I have the super cute Lemon Ellie to show you...but all the new images are very yummy!

Handmade card with Lemon Ellie image by The Paper Nest Dolls

Everything got a little bit distressed in the making of this card with lots of inking, tearing, rolled corners, and bits of lace peeking through!

Handmade card with Lemon Ellie image by The Paper Nest Dolls

Here's the star of the card...so adorable!

Handmade card with Lemon Ellie image by The Paper Nest Dolls

I had to dig out some sunny papers to go with this image.  It's not often I use yellow but it seemed to be called for in this case and I even found the perfect little sentiment cut from one of the papers :-)

Handmade card with Lemon Ellie image by The Paper Nest Dolls

Card recipe;
Image: Lemon Ellie - The Paper Nest Dolls
DP: Nyhanv - Maja Design (available from Live and Love Crafts)
Flowers: Wild Orchid Crafts
Lace: Laila - The Ribbon Girl
Dies: Heart swirl - Magnolia Doohickeys
Stamped edge detail: Goblin branch - Magnolia Rubberstamps

Copic colours;
Skin: E000/00/21/11/04 & R20
Hair: E53/57/59
Dress: B32/34/37
Frills: W00/1/3
Lemon: Y21/35
Leaf: YG61/63/67
Ground: W00/0/1/2/3/4

Wishing you all a great day!

Thanks for visiting and I really appreciate any comments that you leave,


Tuesday, 12 January 2016

Guesting for The Paper Nest Dolls with Mermaid Ellie

Hello lovely people,

Just before Christmas I was asked by Christine of The Paper Nest Dolls if I fancied doing a guest card for her...Errrrr, YES PLEASE!

I also took the opportunity to do the first of my fancy fold tutorials with a gatefold design.
Well, I say tutorial, but it's so easy it doesn't really need much explaining!

First here's my card in it's closed form;

Gatefold card featuring mermaid Ellie by The Paper Nest Dolls


I like to make the base up from scratch for this design, starting with a piece of card 11.5 x 5.75 inches and scoring at 2 & 7/8 inch in from each side.

If you don't have large enough cardstock to cut this in one piece, you could overlap two 5.75 inch square base cards and cut down the front flaps.

Alternatively, use a single 5.75 inch base card, open it out and score the folds as above, then cover the extra fold in the middle with DP.


I like to add a large panel to the left hand side which can be decorated with paper layers and embellishments.
It still stands up just fine I promise!
See...

Gatefold card featuring mermaid Ellie by The Paper Nest Dolls

The right hand flap needs to be left fairly free of embellishments so the card can still close properly but there is just room on this design for a pair of tickets.

On other gatefold designs I have made the panel sticking out from the left hand side smaller to allow room for 3D embellishments on the right hand panel too.


The mermaids are some of my favourite Paper Nest Dolls and mermaid Ellie has assured me she is ready for her close up so here we go...

Gatefold card featuring mermaid Ellie by The Paper Nest Dolls

The twine on here is from my stash but I think it came from some clothes I bought; it was used to attach the labels on them.
I have just curled it into shape and stuck it down with tacky PVA, then frayed the ends slightly.

Gatefold card featuring mermaid Ellie by The Paper Nest Dolls


Card recipe;
DP: Shoreline Treasures - Pion Design (available from Live and Love Crafts)
Flowers: Wild Orchid Crafts
Twine: from stash

Copic colours;
Skin: E000/00/21/11/04 & R20
Hair: E41/43/47
Shell bikini: YR30/31/Y26
Tail: B91/93/95/97/99
Seahorse: B91/93/95/97 & V20/22/25

I hope you enjoyed my tutorial of sorts and maybe next time I will move on to a fancier fancy fold design!

Thanks for visiting and I really appreciate any comments that you leave,