Showing posts with label tea time. Show all posts

Tuesday, 26 January 2016

Cake and bunting

Hello lovely people,

Important date alert...Midday on 28th January is the launch of the new trio stamps from LOTV.
They are so gorgeous I would not be surprised if they sell out super fast so make sure to get your hands on them quick!
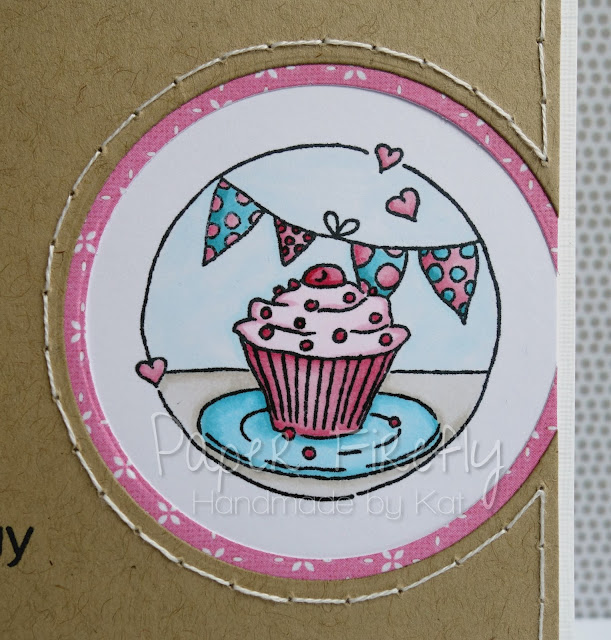
Just to get you excited, I have another sneak peek for you of one of the images from the Time for Tea trio....mmmmm, yummy cake :-)

Sweet and simple card with cupcake and bunting (image from LOTV)


I had a heap of pretty papers out on my desk as I started planning this card, and I only ended up using a tiny piece of 1 paper!  Not like me at all but I had a flash of inspiration and ended up with this CAS design, which is also a nifty way to use up a scrap of DP :-)

Sweet and simple card with cupcake and bunting (image from LOTV)


All the trio images are fab and really versatile but I will always have a soft spot for anything with cake and bunting on it...two of my favourite things!

Sweet and simple card with cupcake and bunting (image from LOTV)

Card recipe;
Image: Time for tea - LOTV
DP: Pastel Dreams (retired) - LOTV
Dies: MFT Die-namics circle stax

Copic colours;
Cupcake case / hearts: R81/83
Cupcake frosting: RV0000/000/R81
Cherry and decorations: R85
Bunting: BG53/57 & R81/83
Plate: B000/BG53
Sky: B0000/000
Table: W00/0/1

Thanks for visiting and I really appreciate any comments that you leave,


Sunday, 17 January 2016

A tea time tutorial

Hello lovely people,

I'm here to showcase some LOTV products today as part of the Design Collective and I have a sneak peek for you of some brand new trio stamp sets coming out at the end of January.

Since my trio of images was tea-themed, they inspired me to make teabag shaped cards and I thought I would show you how I made them with a step-by-step picture tutorial.

Here's the pair of cards I made; they are quite dinky and as you can see, I have used just 2 of the images from the set.

Teabag shaped cards with LOTV Tea for two stamps

I started by cutting a 23 x 8.5cm strip of white linen card and scoring a crease down the middle.
I then scored diagonal lines from 1.5cm in along the middle crease to 2.5cm along the edge of the card from the middle crease.


As I folded the card in half I pushed the diagonal folds inside the card.


I like the way the little folds at the top give it a teabag style feel but if you didn't want to do the folding you could just cut the corners off a regular rectangular base card.


I cut an 11.5 x 8.5cm rectangle of DP to cover the front and used the card base to mark where the corners needed to be cut off.


For the shaped top piece I cut a 5.5 x 2.5cm rectangle of DP and cut the corners off as shown below.  This piece is the same pattern as the main front piece but of course, the pic below is the back of it!


I cut a 2.5 x 2.5cm square of DP to match the main piece and a 5.5 x 8.5cm rectangle of contrasting DP for the strip across the middle.
I inked all the edges with Gathered Twigs Distress Ink.


I added stitching to the 3 largest pieces of DP and you can see where I didn't bother to stitch along the middle of the main piece where it will be covered by the stripy strip!

I added die cut borders to the central strip and mounted my coloured image onto Kraft card.

I didn't want to stitch the tiny tag square so just poked some holes round it instead and added a Kraft heart.


I glued the main DP layer and stripy panel to the card base at this point.

I put 1mm foam pads on the back of the image panel, the top piece and the tag, making sure to leave a gap at the top of the 2 smaller pieces to allow room for the staples.

I tucked one end of an 18cm length of twine under the foam pad of the tag square.


I attached the image circle to the centre of the stripy panel on the card.

I added the staple to the top of the tag and then stuck that in place on the front of the card.


I could then see exactly what length of twine looked good to me, trimmed it down and stapled it in place on the top flap.

Finally I attached the top piece with the foam pad and a line of glue just along the very top to add dimension.


And then it's done!  I had lots of fun making these and hope you enjoyed the tutorial.

Teabag shaped cards with LOTV Tea for two stamps


Card recipe;
Image: Tea for Two Trio - LOTV (coming soon!)
DP: Vintage Autumn basics - Maja Design (available from Live and Love Crafts)
Dies: Heart flower lace - Magnolia Doohickeys, Mini heart collection - Memory Box, Circle stax - MFT Die-namics

Copic colours - teacup image;
Teacup: B91/93/95
Saucer: W00/0/1/3
Teacup spots / saucer rim / flowers: R56/59
Tea: E30/31/33
Biscuit: E25/27
Tablecloth: BG90/93/96

Copic colours - cupcake image;
Cupcake case: RV91/93/95
Cupcake frosting: RV0000/000/91
Bunting: RV91/93/95 & BG90/93/96
Hearts / cherry: RV93/95
Tablecloth: BG90/93

I hope you all had fabulous weekends whatever you were up to :-)

Thanks for visiting and I really appreciate any comments that you leave,


Challenges I am entering;