Showing posts with label red. Show all posts

Friday, 21 April 2017

Garden Girl Carnation

Hello lovely people,

It's Friday so it must be time for me to share my latest Dies to Die For DT card!

Today's temptation comes in the shape of one of the new Stamping Bella images.  I treated myself to a few, having spent ages whittling down my wish list to a size that my credit card could handle!

Bold red and black layered card with Tiny Townie Garden Girl Carnation by Stamping Bella

This is my first purchase of one of the gorgeous little garden girls and although I was tempted to use pink, I decided to go with red.

I know red markers can be a bit 'bleedy' but I love colouring in red, although I had to do this image in several sittings to stop me going cross eyed concentrating on all the teeny petal details!


I also coloured this before picking papers which is not like me at all, but I found some lovely bold papers to match and decided on a clean layered design...but with LOTS of stitching!

Bold red and black layered card with Tiny Townie Garden Girl Carnation by Stamping Bella

If I've tempted you with any of the lovely supplies I've used then you can go straight to the individual products via the thumbnails at the end of my post or just pop over to Dies to Die For and have a little browse around!

Thanks for visiting and I really appreciate any comments that you leave,


Copic colours;
Skin: E000/00/21/11/04
Hair / sash / shoes: T5/7/100
Flowers / dress: R35/37/39
Stem / leaves: YG61/63/67
Ground: W00/W0/T1/T2

Lovely things I've used from Dies to Die For;
Monday, 11 July 2016

Peace on Earth

Hello lovely people,

I have just 9 weeks left of my career break and now my course and the USA trip are all done and dusted, I am suddenly feeling an urgency to tick off a few more goals for the year.

So, this week my plans include;
 - making serious inroads towards completing the Kit and Clowder skin/hair colouring class
- buying a few new kitchen items that we need; kettle, saucepans, hand blender
- start seriously decluttering the house

I have made a start today by sorting through all the accumulated stuff in the area behind the sofa in the cinema room and got rid of loads :-)

I did find time to play with some of the new release Christmas images from LOTV though.  I say 'new' but actually the image I have used today is one of our returning friends.

Christmas angel in traditional red and green (image from LOTV)

I never had this cutie the first time round (I'm shocked too!) but couldn't resist her second time around :-)

I was planning to colour her dress in white because...well, it's easiest!  At the last minute I decided to make life a little harder for myself and go for red instead because I thought it would match the papers better *sigh*

Christmas angel in traditional red and green (image from LOTV)

I often like non-traditional colours for Christmas cards but this Maja Design collection is so beautiful and it does suit the angel rather well I think.

Christmas angel in traditional red and green (image from LOTV)


The release date for all the images is...TOMORROW!!
As usual, I would get in quick if you don't want to miss out...there are some super cute new stamps and more fab returning friends :-)

Thanks for visiting and I really appreciate any comments that you leave,


Card recipe;
Image: Christmas angel flying - LOTV (coming back soon!)
DP: A Gift for you - Maja Design (available from Live and Love Crafts)
Dies: Fanciful trim - Creative Expressions
Charm: Holly leaves tiny - The Ribbon Girl

Copic colours;
Skin: E000/00/21/11/04 & R20
Hair: E41/43/47
Dress: R27/46/89
Wings: W00/1/3
Holly: BG93/96 & R59/89

Monday, 16 May 2016

Gamer Andy

Hello lovely people,

Today I have another commissioned card to share with you and this one was for a little boy who loves playing computer games.

I have to admit that stars are my 'go to' for adding detail to boys cards but in this case they worked especially well to match the stars on the DP.

Birthday card for a boy featuring Whimsie Doodles image of boy with game controller

I had a few images in mind for this card but this one was the winner and oh my gosh, isn't he adorable?!

Birthday card for a boy featuring Whimsie Doodles image of boy with game controller

Card recipe;
DP: Home for the Holidays - Maja Design (available from Live and Love Crafts)
Dies: Cosmic star set & Precious stars - Memory Box
Paperclip: from stash

Copic colours;
Skin: E000/00/21/11/04 & R20
Hair: E53/57/59
T-shirt / stars / socks: R27/46/39
Pyjama bottoms / T-shirt circle: B23/26/29
Lightning bolt: Y23/35/YR23
Game controller: W1/3/4 & W7/G07/B24 for buttons and W00/1 for joystick
Ground: W00/0/1/2/3/4

Thanks for visiting and I really appreciate any comments that you leave,


Sunday, 31 May 2015

Ruby wedding anniversary

Hello lovely people,

I've had a weekend packed with celebrations; firstly my parents' 40th wedding anniversary and then my sister-in-law's 40th birthday.

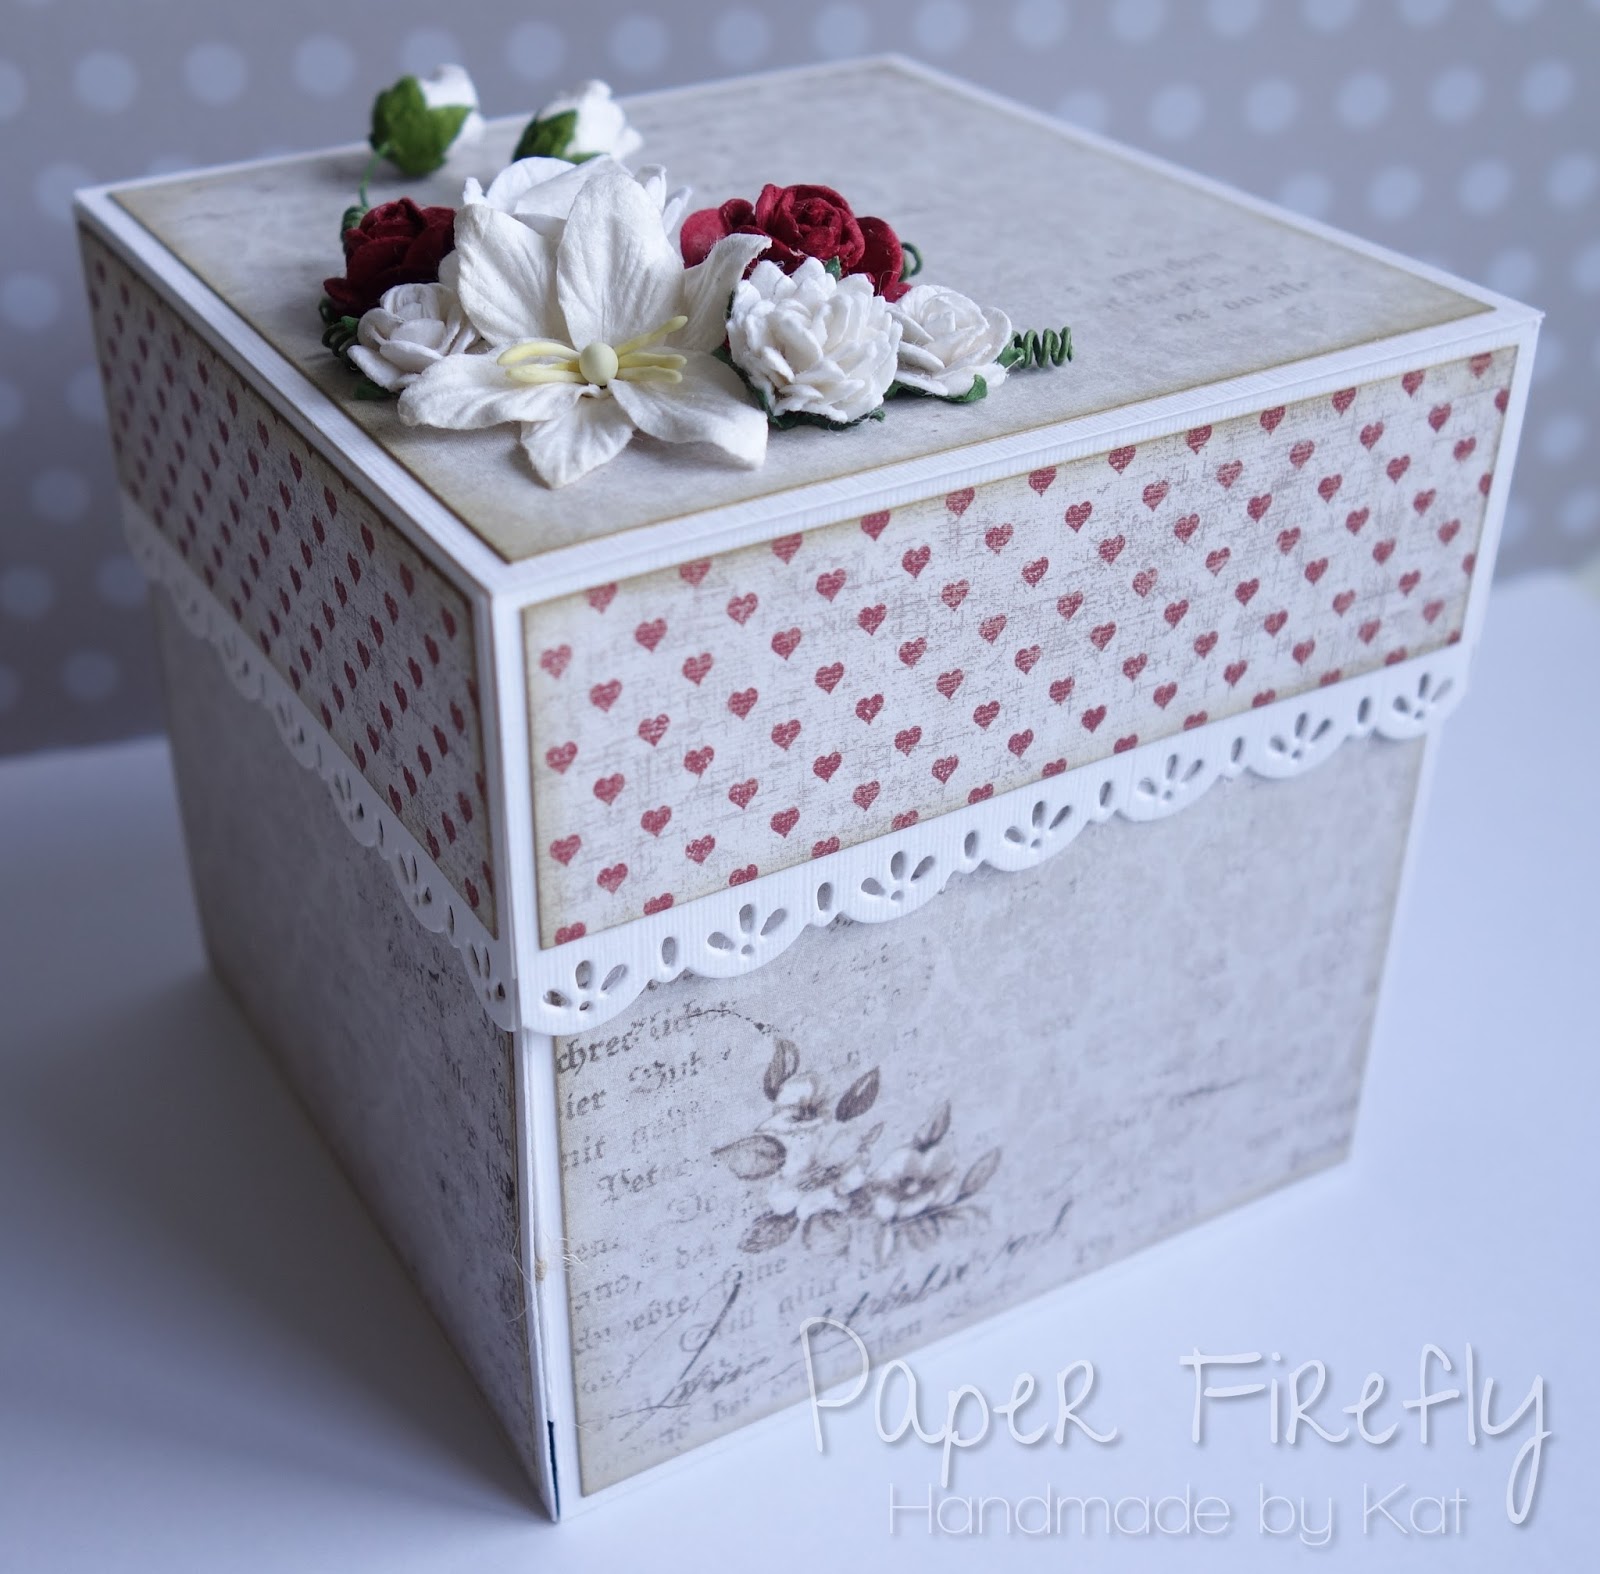
I decided to take the plunge and make an exploding box card for my parents' anniversary card so here's what it looks like from the outside...


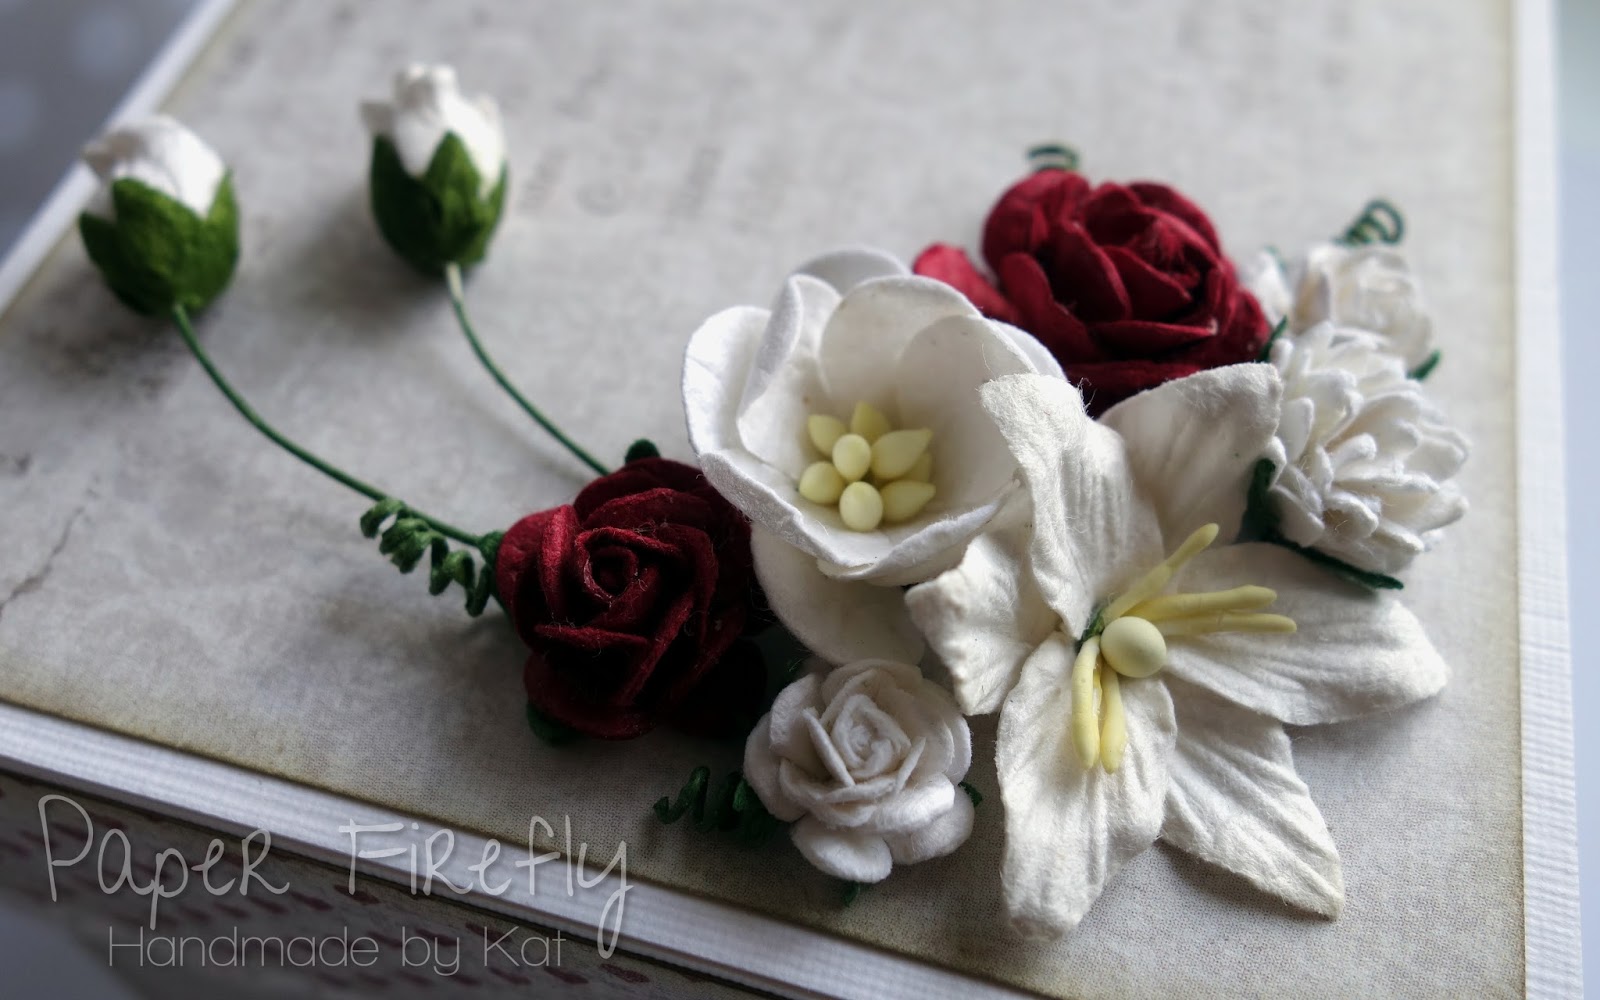
I kept the outside fairly simple and used several different flowers to make a little 'bouquet' on the top.


Since 40 years is ruby I wanted to use some red in the design...now, that is a colour that I have very little of in my paper collection!

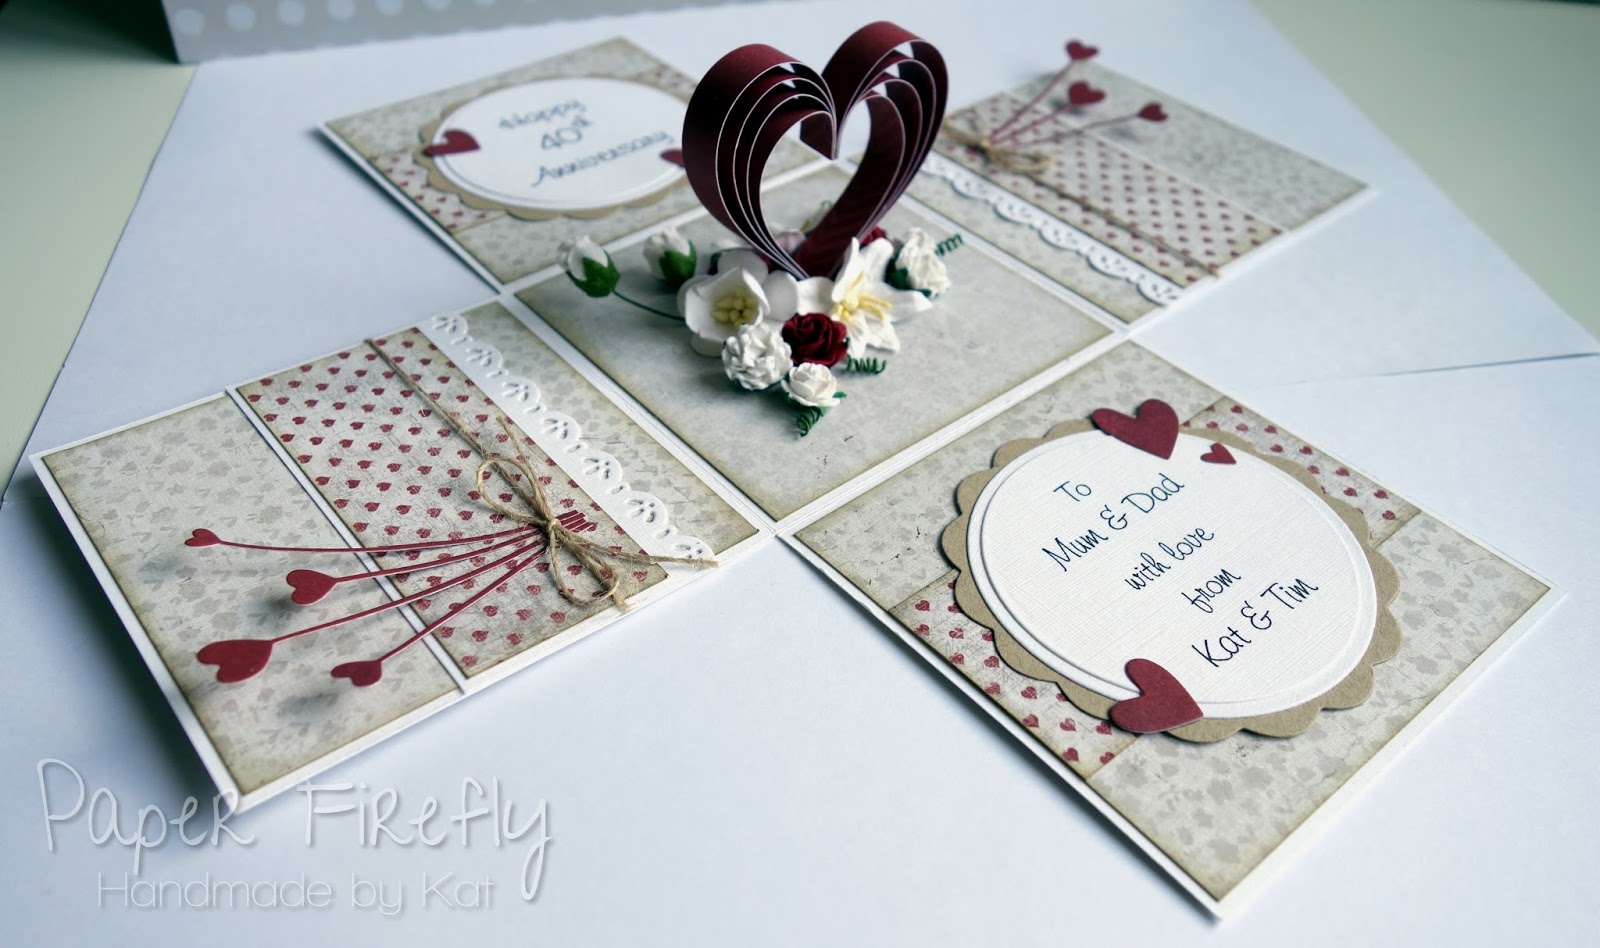
I made the most of a small leftover piece of gorgeous Maja Design heart paper and scrounged together a few scraps of plain red - just enough for the heart centrepiece and a few heart stems!


The heart centrepiece is made from strips of paper and is held in place with a rather large blob of glue, which I hid with a whole heap of flowers!


The little heart stems are a real favourite die of mine and I think they look so cute 'tied' with a twine bow.


Card recipe;
DP: Vintage baby - Maja Design (available from Live and Love Crafts) and scraps of red from stash
Tag: Sentiment tags - LOTV
Dies: Circle stax - MFT Die-namics, Vintage lace - Magnolia Doohickey, Heart stems - Impression Obsession, Tiny heart set - Memory box, scalloped circles - Spellbinders I think!
Sentiments: done on computer (font - Kayleigh)

I am pleased to say that my parents loved this 'card' and we had a wonderful time celebrating their special anniversary.
I'll have more cards from the weekend to share with you soon!

Thanks for visiting and I really appreciate any comments that you leave,


Challenges I am entering;
1.  Simon Says Stamp (anything goes)
2.  A Gem of a Challenge (flowers)

Saturday, 11 April 2015

A love story

Hello lovely people,

Well this is exciting...I have my first card to share as part of the LOTV Design Collective and it's a little romantic number...

Romantic card featuring LOTV love balloon stamp

I had an urge to do some monochrome colouring with this fab image and I'm really happy with how it turned out.  Ok, not properly monochrome since I couldn't resist a little splash of red to match the papers!

Romantic card featuring LOTV love balloon stamp

I made a little tag to tuck in behind the image :-)

Tag from romantic card featuring LOTV love balloon stamp

Now you see those yummy papers?  They are actually a Christmas collection!
I thought they were fab for a bold romantic look though and I just avoided the ones with snowflakes on!

Romantic card featuring LOTV love balloon stamp

Card recipe;
DP: A gift for you - Maja Design (available from Live and Love Crafts)
Sentiment and stamped love heart on tag: Love sentiments - LOTV
Dies: old swedish lace - Magnolia Doohickey

Copic colours;
Balloon / flowers / bow: R27/46/39/59
Everything else: all the W series, mostly using 3 colour combos with alternate numbers e.g. 3/5/7

We have friends coming round any moment now and we're going to have a chat about me making their wedding invitations, trying out the banana choc chip oat muffins I made this morning and going for a curry this evening :-)

I hope you have a delightful weekend whatever you are up to!

Thanks for visiting and I really appreciate any comments that you leave,


Challenges I am entering;
1.  Noor Design (anything goes)
2.  Papertake Weekly (anything goes)
3.  Inky Chicks (stitching)

Wednesday, 28 January 2015

Tilda with hearts

Hello lovely people,

I always enjoy my Wednesdays off work and usually manage quite a bit of crafty time.

Today the mood took me to do a CAS design and practice my colouring, plus with Valentine's Day coming up I thought I'd do a little love-themed card.


I stretched myself a bit with this image since I really haven't mastered wavy/curly hair yet...ok, I know, that's what practice is for!


Card recipe;
Image: Love love love Tilda - Magnolia Rubberstamps
Tag: Sentiment tags - LOTV
Wooden heart button: from stash
Pearl dots round image: Viva pearl pen

Copic colours;
Skin: E000/00/21/11/04 & R20
Hair: E21/25/29
Dress: R24/27/46/39
Shoes / dress waistband: T6/7/10/100
Lace at bottom of dress: T0/2/4
Hearts: R39/59
Ground: T0/1/2/3/4

To complete my fabulous day today I met up with a lovely lady (Debs) who recently joined the In The Pink DT and it turns out we live in the same village!
We had a chat over coffee and cake - perfect :-)

Thanks for visiting and I really appreciate any comments that you leave,


Challenges I am entering;
1.  Marvellous Magnolia (love)
2.  Papertake Weekly (Take your pick - warm colours (red) and buttons)
3.  Midweek Magnolias (Valentine/romance/love)
4.  ABC (buttons and bows)
5.  Tilda's Town (be mine valentine)

Sunday, 30 November 2014

Tilda in red

Hello lovely people,

I hope you all had a lovely weekend.  I certainly did although it involved more drinking and dancing with friends than crafting!

I said I had lots of cards to share with you and it will be no surprise that a lot of them are Christmas cards!
This one is using the absolutely stunning new DP collction from Maja Design; I think the red/grey/white colour scheme is so elegant; I have used mainly the white and pale grey papers here.


Yes, that is a new Tilda!  I managed to keep to my resolution of just buying one stamp from the latest collection and this was a stand out favourite for me.


I opted for something a little different to my usual 3D paper flowers to embellish and cut these poinsettias with my Cricut from the lovely red DP.


Card recipe;
Image: Christmas Candle Tilda, from Waiting for Christmas collection
DP: A gift for you - Maja Design (available from Live and Love Crafts)
Dies: Anja's vintage swirls - Marianne Design
Sentiment: cut from DP, plus free alphabet stamps for names

Copic colours;
Skin: E000/00/21/11/04 & R20
Hair: E50/43/44
Coat - hat: R27/46/39/89
Fur on hat: W00/0/1/2
Glove / boots: W3/4/5/6
Candle: YR30/31 & Y21/23/38
Foliage: YG93/95/97 & R46/39
Ground: W00/0/1/2/3/4

I hope you are all starting to feel festive - has anyone got their tree up yet?!


Challenges I am playing along with;
1. Marvellous Magnolia (anything goes Christmas)
2.  Sweet Magnolia (use a die cut)
3.  Tilda's Town (it's winter)
4.   The Ribbon Girl (Magnolia only - Christmas)
5.  As You Like It (fave Christmas style - I tend to go for a traditional feel as it suits the images I like to use but do enjoy using non-traditional colours to give it my own twist)
6.  Simon Says Stamp (anything goes)