Showing posts with label Valentine's Day. Show all posts

Friday, 25 January 2019

Love potion No.9

Hello lovely people,

I have a confession to make...I had a little splurge on the most recent Stamping Bella release and I treated myself to a whole day of playing with some of the stamps I bought :-)

So, I have my first one to share with you for my Dies to Die For DT card this week...

Handmade Valentine's Day card using Love Potion Oddball by Stamping Bella

I am now very much a 'less is more' kind of girl when it comes to card design, but especially so when it comes to large images with lots of detail such as this one.

BTW the Label Maker Love stamps and dies I used for the cute sentiment are on sale with 30% off right now...just sayin'!


This is the first of the Oddballs that I have bought and I just know I'll have to get some more because I simply adore this one...so quirky and a bit gothic but still cute!


If I've tempted you with any of the lovely supplies I've used then you can go straight to the individual products via the links below or just pop over to Dies to Die For and have a little browse around!

Thanks for popping in and I hope you have a fabulous day!


Lovely things I've used from Dies to Die For;
Love potion Oddball - Stamping Bella
Sweet stack 6x6 pad - My Favorite Things
Black and white basics 6x6 pad - My Favorite Things
Stitched rectangle scallop edge frames - My Favorite Things
Label Maker Love - My Favorite Things

Copic colours;
Skin: E000, E51, E21
Hair: T2, T4, T6
Skulls / bottle / tights: T0, T2
Eyes: B0000
Eyeshadow: T0, T1, T3
Dress: T4, T6
Dress skirt: T0, T1, T2, T3, T4
Tights (red stripes) / Potion: R35, R37, R39
Shoes: T4, T6, T7
Ground: T0, T1, T2, T3


Friday, 11 January 2019

Wing-flapping happy!

Hello lovely people,

So, it's 2019 and I am super excited for a lovely new year of crafting!

I've already placed several orders for new crafting stash (!) but my Dies to Die For DT card this week is using some stamps from the December MFT release, which I thought maybe I should use before I move on to the January release - lol!

Cute owl couple card using Forever and Owlways stamps from MFT


Just for something a little bit different I thought I'd colour the owls in pastel shades and I think they look pretty cute!

For once I didn't pick out the papers before I coloured the owls, but I found just the right shades to match - yay!

Cute owl couple card using Forever and Owlways stamps from MFT

If I've tempted you with any of the lovely supplies I've used then you can go straight to the individual products via the links below or just pop over to Dies to Die For and have a little browse around!

Thanks for popping in and I hope you have a wing-flapping happy day!


Lovely things I've used from Dies to Die For;
Forever and owlways - My Favorite Things
Fresh squeezed chevrons 6x6 paper pad - My Favorite Things
Inside and out stitched circle STAX - My Favorite Things
Blueprints 31 - My Favorite Things (for the sentiment strip)

Other ingredients;
Nuvo crystal drops in Carnation pink and Caribbean ocean
Glamour Dust in Crystal

Copic colours;

Blue owl: B00, B01, B02
Blue owl tummy / face: B0000, B000, B00
Pink owl: RV10, RV11, R83
Pink owl tummy / face: RV0000, RV00, RV10
Beaks / feet: YR20, YR21
Branch: E41, E42, E43, E44
Leaves: YG00, YG01, YG03


Friday, 2 February 2018

Jar of hearts

Hello lovely people,

You can tell it's Friday if I'm posting, as I only seem to have time for blogging my Dies to Die For DT cards at the moment.

I'm still creating love themed cards with all my fab new stash and today is a little Lawn Fawn offering...

Jar of hearts Valentine's Day card using How You Bean and Conversation Hearts add-on from Lawn Fawn

The 'How You Bean' jar stamp and die set was released a little while ago but the Conversation Hearts add-on is part of the newest release and I loved it so much, I just had to go back and buy all the original jar stamps/dies so I could get the heart add-on!

I stamped and coloured the hearts and then decided to add the words...all I can say is thank goodness for the MISTI, combined with a bit of judicious masking!

Jar of hearts Valentine's Day card using How You Bean and Conversation Hearts add-on from Lawn Fawn

If I've tempted you with any of the lovely supplies I've used then you can go straight to the individual products via the links at the end of my post or just pop over to Dies to Die For and have a little browse around!

Thanks for visiting and I really appreciate any comments that you leave,


Copic colours;
Green hearts: G000, G00, YG41
Purple hearts: BV31, BV11, V25
Pink hearts: RV52, RV63, RV55
Yellow hearts: YR30, YR20, YR21
Jar: B0000, B000
Lid: C2, C4, C5, C6

Lovely things I've used from Dies to Die For;
How You Bean? stamps - Lawn Fawn
How You Bean? dies - Lawn Fawn
How You Bean? Conversation heart add-on stamps - Lawn Fawn
How You Bean? Conversation hearts add-on dies - Lawn Fawn
A2 stitched rectangle STAX 2 - My Favorite Things

Other ingredients;
Let's Polka in the Meadow 6x6 pad - Lawn Fawn
Twine, tiny tag - from stash

Friday, 26 January 2018

Monster-sized love

Hello lovely people,

It's Friday and time for my Dies to Die For DT card, which features some of the gorgeous new love-themed release from MFT.

Punny monster Valentine's Day card (using Monster Sized by MFT)

I've used the peek-a-boo heart to create an aperture for my little monster to climb out of; he thinks he's scary but I think he's more cute than scary!

Punny monster Valentine's Day card (using Monster Sized by MFT)

If I've tempted you with any of the lovely supplies I've used then you can go straight to the individual products via the links at the end of my post or just pop over to Dies to Die For and have a little browse around!

Thanks for visiting and I really appreciate any comments that you leave,


Friday, 19 January 2018

Rawr!!

Hello lovely people,

I am so in love with all the cute new releases for Valentine's Day so you may be seeing a bit of a love theme on my blog over the next few weeks, starting with my Dies to Die For DT card.

Cute punny Valentine's Day card with adorable dinosaur (image is Rawr! from Lawn Fawn)

I think this little dino is utterly charming and I've used the little speech bubble and sentiment to create a fun design.

Cute punny Valentine's Day card with adorable dinosaur (image is Rawr! from Lawn Fawn)

I hope you've had a good week and have something fun planed for the weekend!

If I've tempted you with any of the lovely supplies I've used then you can go straight to the individual products via the links at the end of my post or just pop over to Dies to Die For and have a little browse around!

Thanks for visiting and I really appreciate any comments that you leave,


Thursday, 2 February 2017

Wool you be mine?

Hello lovely people,

I hope you are all having a good week so far.

I had a day off on Monday after spending the day on Sunday helping out at the Dies to Die For stand at the Sincerely Yours papercraft show in Thetford.  I had a fabulous day out with my crafty buddies, and I may have bought a few bits and pieces that I found I 'needed' ;-)


It's time for a new challenge at In The Pink and our theme is...

WITH LOVE
Don't forget we want to see more pink than any other colour!

Our lovely sponsor this time is Di's Digi Stamps with a $12 voucher


Amongst my purchases on Sunday, I couldn't resist adding to my collection of MFT cute critters, so my card today is a really simple one using one of the adorable sheep that came home with me!

Humorous sheep Valentine's Day card (image and papers from My Favourite Things)

I wasn't entirely sure how I would colour the fluffy wool, but it was actually super easy to do with just a few flicks to suggest a bit of texture.

It's always a bit of a blow to the credit card to get the matching dies but I can honestly say it's a good investment because I really love to cut those critters out and pop them on foam pads.

Humorous sheep Valentine's Day card (image and papers from My Favourite Things)

Dr. Hubby was so not impressed with the punny sentiment but it made me giggle!

The scallop frame and stitched hillside are also new additions to my stash ;-)

Humorous sheep Valentine's Day card (image and papers from My Favourite Things)

If you haven't already done so then do pop over to In The Pink and check out the gorgeous creations from the rest of the Pink Ladies.

Thanks for visiting and I really appreciate any comments that you leave,


Copic colours;
Sheep body: W00/T1/3
Sheep face / legs: T3/4/5
Sheep hooves: T4/5/6
Heart: RV32/34

Lovely products that I used;

Wednesday, 25 January 2017

I'm owl yours

Hello lovely people,

I'm super excited today for 2 reasons;
1) This is my first DT post for Dies to Die For!
2) I have a crafty play date today with my awesome buddies Sue and Debs!

My Favourite Things have tempted me BIG time with their latest release, and top of my list to play with were some super cute owls.

I actually used to collect little pottery/china owls when I was a kid so I do have a soft spot for them!

Cute funny owl card (owl from My Favourite Things)

I got the matching dies so I could cut them out easily but also decided to paper piece the chest of this one to go with the love theme of the card...how cute is his little red heart chest?!

I layered up 3 die cut scalloped frames to make an aperture for the owl to sit in, but he looked a bit sad in there all on his own so I gave him a little branch to perch on...much better :-)

Cute funny owl card (owl from My Favourite Things)

I don't use embossing enough but it just popped into my head to use it on this design instead of DP and I'm glad I did.

The stamp set comes with lots of fun sentiments and I added one that I thought would make this a great Valentine's Day card.

Cute funny owl card (owl from My Favourite Things)


I decided to sign up to InLinkz so I can now put those cute little thumbnail links at the bottom of my post, which makes it really easy for you to go straight over to check them out at Dies to Die For ;-)

Thanks for visiting and I really appreciate any comments that you leave,


Copic colours;
Owl body: E41/42/43
Beak: E43/44
Eyes: B0000/blender


Monday, 8 February 2016

Just my type

Hello lovely people,

I'm busy busy with some custom orders at the moment; isn't it nice to be in demand?!

So, I'm just popping in really quickly with a cute little Valentine's Day card.

Handmade fun typewriter card


The typewriter image (now sadly unavailable) came with some individual pages with sentiments on and also a blank page image, so I chose a typewriter style font to add my own text to the blank page image, cut it out and put a thin foam pad underneath the top.

I was then able to use the same font for the word labels underneath so it's all nicely co-ordinated :-)

Handmade fun typewriter card


Card recipe;
Image: retired digi from Pink Petticoat
DP: A gift for you - Maja Design (available from Live and Love Crafts)
Dies: Notebook edge die - Clearly Besotted
Paperclip: from stash
Sentiment: done on computer (font: Travelling typewriter)

Copic colours;
Main body of typewriter: W00/0/1/2/3
Darker details on typewriter: W3/5/7
Hearts: R46/59

I hope you all have a good week :-)

Thanks for visiting and I really appreciate any comments that you leave,

Thursday, 4 February 2016

With love

Hello lovely people,

Eeeeeek, the Friday coursework deadline is fast approaching and I still have lots to do so it's just a quick post from me I'm afraid.


We have a brand new challenge for you at In The Pink and our theme this time is...

WITH LOVE
Don't forget we want to see more pink than any other colour!

Our fabulous sponsor this time is Little Miss Muffet Stamps with a $6 voucher

I piled on the romance with this one using some of my all time fave Maja Design papers; they even come with cute sentiment strips along the bottom as a bonus :-)

Pink romantic card featuring Tilda with large rose

This is another Tilda from my collection of Tildas that have never seen ink...well, at least the collection is smaller now!

Pink romantic card featuring Tilda with large rose

Ooops, predictable Kat again with the flower, swirl, charm combo...but it looks so pretty I hope I can be excused!

Pink romantic card featuring Tilda with large rose

Card recipe;
Image: Tilda with a big rose
DP: Coffee in the Arbour & Sofiero - both Maja Design (available from Live and Love Crafts)
Flowers: Wild Orchid Crafts
Lace: The Ribbon Girl but discontinued in white - ivory Matilda available
Dies: Heart swirl - Magnolia Dohickeys

Copic colours;
Skin: E000/00/21/11/04 & R20
Hair: E53/37/59
Dress / shoes: RV32/34/R56
Pocket / rose: RV0000/000/32
Leaves: YG61/63/67
Ground: W00/0/1/2/3/4

If you haven't already done so then do pop over to In The Pink and check out the gorgeous creations from the rest of the Pink Ladies.

Thanks for visiting and I really appreciate any comments that you leave,


Monday, 1 February 2016

Romantic stepper card with tutorial

Hello lovely people,

Gosh, doesn't time fly?!
I intended to post this over the weekend but got carried away with other things...all good!
I hope you all had a lovely weekend whatever you were up to :-)

I have another stepper card to share with you and this time I have done a tutorial to go with it.
I am also showing off some lovely LOTV products on this card as part of the Design Collective.

So, first up I'll show you the finished card and then I'll get into the tutorial.

Romantic fancy fold card featuring dog with balloon (image from LOTV)

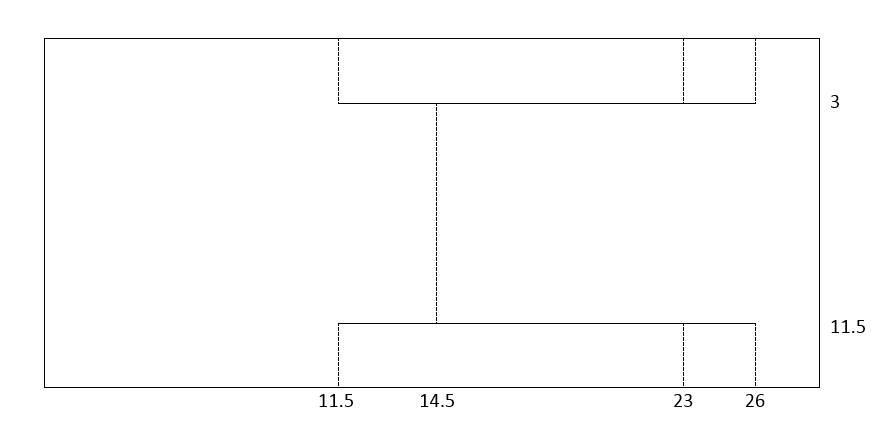
I started with a 14.5 x 29cm rectangle of card, and the picture below shows where I made the scores (dashed lines) and cuts (solid lines).

I always start by making little marks on all four edges of the back of the card (what will be the inside) at the indicated measurements on the picture.

Then I make the 2 cuts (the solid horizontal lines) with a craft knife and finally I score the other lines with a very ancient metal toothpick...but I guess any scoring tool that you have will be fine!

This method means that I cut and score exactly the bits that I need to and no more, so you end up with a nice complete back panel and no unsightly extra score lines.


I then gradually fold it up, starting with the middle fold and working down from there.
One of the folds (second from right hand side) is technically scored the 'wrong' way round for folding if you do all the score lines on the back, but I find it's a lot easier to score everything just on one side and just take care when folding it.

I sometimes like to get a little extra space on my central panel so for this design I cut a rectangle of white card and die cut the left and right hand sides, so the finished panel, as below, ended up about 11.5 x 13cm.


I cut rectangles of DP just slightly smaller than the side and bottom panels so a little white border is visible.
As usual, all the panels were inked and stitched.

I wrapped the bottom panel with twine before I attached it.
Now, I've been asked a few times how I attach twine and my main tip is just to fray the end of the twine first so it lays a bit flatter, then I simply tape it down!
Like so...


I then added the pink heart panel and image panel, sliding them under the twine.  I had to be very specific about the order in which I added the layers and twine so I could get the twine on top of the image!

Romantic fancy fold card featuring dog with balloon (image from LOTV)

And I can't finish without a close up of the adorable dog, which Dr. Hubby says is entirely unrealistic because dogs don't have opposable thumbs so there is no way he could hold on to the balloon - lol!

Romantic fancy fold card featuring dog with balloon (image from LOTV)

Card recipe;
Image: Odd Dog  -Balloon - LOTV
DP: Yours truly - Pebbles
Tag: Sentiment tags - LOTV
Dies: Heart flower lace - Magnolia Doohickeys, Heart stems - Impression Obsession
Sentiment:

Copic colours;
Dog: W1/2/3/4/5
Ligt patches on dog: W00/0/1
Shading on balloon: RV34 & blender

The stepper card is not the fanciest of fancy folds but it's one I really like and I hope some of you may find something of use in my tutorial, so thanks for reading :-)

Thanks for visiting and I really appreciate any comments that you leave,