Showing posts with label tutorial. Show all posts

Monday, 1 February 2016

Romantic stepper card with tutorial

Hello lovely people,

Gosh, doesn't time fly?!
I intended to post this over the weekend but got carried away with other things...all good!
I hope you all had a lovely weekend whatever you were up to :-)

I have another stepper card to share with you and this time I have done a tutorial to go with it.
I am also showing off some lovely LOTV products on this card as part of the Design Collective.

So, first up I'll show you the finished card and then I'll get into the tutorial.

Romantic fancy fold card featuring dog with balloon (image from LOTV)

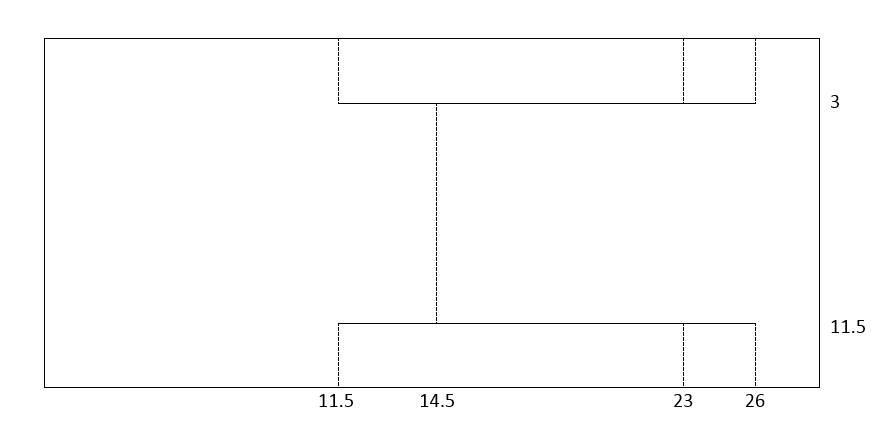
I started with a 14.5 x 29cm rectangle of card, and the picture below shows where I made the scores (dashed lines) and cuts (solid lines).

I always start by making little marks on all four edges of the back of the card (what will be the inside) at the indicated measurements on the picture.

Then I make the 2 cuts (the solid horizontal lines) with a craft knife and finally I score the other lines with a very ancient metal toothpick...but I guess any scoring tool that you have will be fine!

This method means that I cut and score exactly the bits that I need to and no more, so you end up with a nice complete back panel and no unsightly extra score lines.


I then gradually fold it up, starting with the middle fold and working down from there.
One of the folds (second from right hand side) is technically scored the 'wrong' way round for folding if you do all the score lines on the back, but I find it's a lot easier to score everything just on one side and just take care when folding it.

I sometimes like to get a little extra space on my central panel so for this design I cut a rectangle of white card and die cut the left and right hand sides, so the finished panel, as below, ended up about 11.5 x 13cm.


I cut rectangles of DP just slightly smaller than the side and bottom panels so a little white border is visible.
As usual, all the panels were inked and stitched.

I wrapped the bottom panel with twine before I attached it.
Now, I've been asked a few times how I attach twine and my main tip is just to fray the end of the twine first so it lays a bit flatter, then I simply tape it down!
Like so...


I then added the pink heart panel and image panel, sliding them under the twine.  I had to be very specific about the order in which I added the layers and twine so I could get the twine on top of the image!

Romantic fancy fold card featuring dog with balloon (image from LOTV)

And I can't finish without a close up of the adorable dog, which Dr. Hubby says is entirely unrealistic because dogs don't have opposable thumbs so there is no way he could hold on to the balloon - lol!
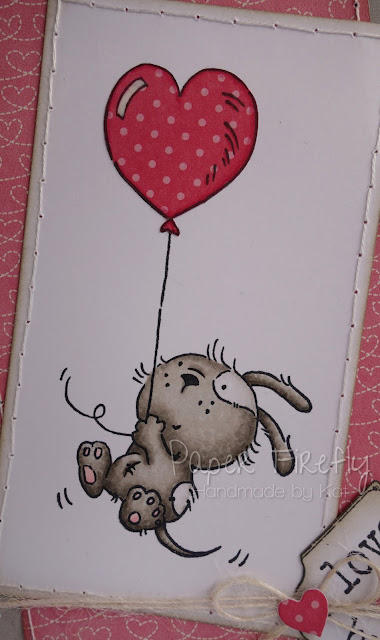
Romantic fancy fold card featuring dog with balloon (image from LOTV)

Card recipe;
Image: Odd Dog  -Balloon - LOTV
DP: Yours truly - Pebbles
Tag: Sentiment tags - LOTV
Dies: Heart flower lace - Magnolia Doohickeys, Heart stems - Impression Obsession
Sentiment:

Copic colours;
Dog: W1/2/3/4/5
Ligt patches on dog: W00/0/1
Shading on balloon: RV34 & blender

The stepper card is not the fanciest of fancy folds but it's one I really like and I hope some of you may find something of use in my tutorial, so thanks for reading :-)

Thanks for visiting and I really appreciate any comments that you leave,


Tuesday, 12 January 2016

Guesting for The Paper Nest Dolls with Mermaid Ellie

Hello lovely people,

Just before Christmas I was asked by Christine of The Paper Nest Dolls if I fancied doing a guest card for her...Errrrr, YES PLEASE!

I also took the opportunity to do the first of my fancy fold tutorials with a gatefold design.
Well, I say tutorial, but it's so easy it doesn't really need much explaining!

First here's my card in it's closed form;

Gatefold card featuring mermaid Ellie by The Paper Nest Dolls


I like to make the base up from scratch for this design, starting with a piece of card 11.5 x 5.75 inches and scoring at 2 & 7/8 inch in from each side.

If you don't have large enough cardstock to cut this in one piece, you could overlap two 5.75 inch square base cards and cut down the front flaps.

Alternatively, use a single 5.75 inch base card, open it out and score the folds as above, then cover the extra fold in the middle with DP.


I like to add a large panel to the left hand side which can be decorated with paper layers and embellishments.
It still stands up just fine I promise!
See...

Gatefold card featuring mermaid Ellie by The Paper Nest Dolls

The right hand flap needs to be left fairly free of embellishments so the card can still close properly but there is just room on this design for a pair of tickets.

On other gatefold designs I have made the panel sticking out from the left hand side smaller to allow room for 3D embellishments on the right hand panel too.


The mermaids are some of my favourite Paper Nest Dolls and mermaid Ellie has assured me she is ready for her close up so here we go...

Gatefold card featuring mermaid Ellie by The Paper Nest Dolls

The twine on here is from my stash but I think it came from some clothes I bought; it was used to attach the labels on them.
I have just curled it into shape and stuck it down with tacky PVA, then frayed the ends slightly.

Gatefold card featuring mermaid Ellie by The Paper Nest Dolls


Card recipe;
DP: Shoreline Treasures - Pion Design (available from Live and Love Crafts)
Flowers: Wild Orchid Crafts
Twine: from stash

Copic colours;
Skin: E000/00/21/11/04 & R20
Hair: E41/43/47
Shell bikini: YR30/31/Y26
Tail: B91/93/95/97/99
Seahorse: B91/93/95/97 & V20/22/25

I hope you enjoyed my tutorial of sorts and maybe next time I will move on to a fancier fancy fold design!

Thanks for visiting and I really appreciate any comments that you leave,

Tuesday, 9 December 2014

Pegs

Hello lovely people,

It's time for a new challenge at Top Tip Tuesday and our theme this time is...

INSPIRED BY SOMETHING IN YOUR HOME

This is a really lovely theme as there are so many options; something you love the colours of, an object that is really special to you or maybe just something really really boring that you can make into something much better...

That's what I was thinking when I stumbled upon a big bag of pegs.  Now, I don't have a washing line so haven't used these for about 10 years but I was so excited to rediscover them and had lots of ideas going through my head as to what I could do with them.


I knew exactly what colour I wanted to use (lol!) and I wanted them to have a slightly shabby chic feel with just a little cute embellishment so here's what I came up with;


I took the liberty of creating a little photo tutorial for you as I went along, just in case anyone else wants to have a go at this... and why wouldn't you?!

First I painted the pegs with one coat of white acrylic paint.  I took the pegs apart to do this so I could get into all the cracks.  I didn't worry too much about the flat outside sections as these were going to be covered by paper.


Then I cut little strips of different co-ordinating papers - use up those scraps people!


I trimmed each piece of paper to exactly the right size for each individual peg as I went along and glued them down with tacky PVA.  I put a little glue on the peg like this;


Then I spread it out with my finger so the whole area was covered and pressed the paper strip on top, smoothing it down firmly.


Now, these looked a little too pristine for my liking so I used very fine sandpaper to sand the edges of each paper strip which gives a nice finish and makes the strip kind of 'blend into' the edges of the peg.


I then put the pegs back together and added the finishing touch with a die cut flower and paper rose on each one.


I brushed some Wink of Stella over the roses which gives them a gorgeous subtle sparkle.. too subtle for the camera maybe?!


I think these would be nice with magnets on the back to pop on your fridge or maybe with drawing pins on the back so they could be pushed into a cork board.

Then you can use them to clip up anything you like...


Peg recipe;
Paint: Adirondack acrylic paint dabber (white) - Ranger
DP: Special delivery (girl) - Pebbles
Dies: Fancy blossoms - Memory box

I hope you will pop over to Top Tip Tuesday and check out what has inspired the fabulous creations from the rest of the team.

Thanks for visiting and I really appreciate any comments that you leave,


Challenges I am entering;
1.  A Little Bit Crafty (anything goes but not Christmas)

Tuesday, 1 April 2014

Buckle up!

Hello lovely people,

Today I have TWO projects to share with you and look what is first up...


Yep, that's right, I'm super excited to be doing a guest DT spot at  Top Tip Tuesday and the theme this time is...

CUTE

I was asked if I would do a tutorial and I knew straight away that I wanted to share how to make a buckle card.
I first saw this type of card here on Lyndsey's blog and just had to have a go myself, so here's a little look at what the finished card looks like...


And here's how to make it...

Cut a 4cm strip from the front right hand side of a 145cm square base card and save the offcut strip for later

Cut a panel of patterned paper to fit the front of the card and 2 panels to fit the inside of the card, leaving a small white border.  If desired, ink and stitch round the edges of all the panels

Glue the patterned paper panel to the front of the card

Take the offcut strip from step one, round the corners at one end then score and fold at 9cm from this end. This will form the 'buckle' strip.

Cut a small panel of patterned paper to fit the front of the buckle leaving a small white border, inking and stitching edges if desired.  Glue panel to buckle strip.

Inside the card mark out a slot roughly 4mm wide on the left hand side 4cm up from the bottom and 3cm from the left hand edge and cut out with a craft knife; the exact size and placement of the slot is not crucial and can be adjusted to fit where you would like it underneath the image

Attach buckle strip to right hand side 4cm up from the bottom so that the fold line of the buckle lines up with the right hand edge of the card and will fold neatly over the front of the card when closed

Glue patterned paper panel to right hand inside to cover the buckle

Stamp and colour image, trim to size and mat onto a piece of Kraft card. Cover back of image panel with foam pads or tape except for where the buckle will pass behind it; you can mark out where the slot will be by placing the image panel on the front of the card and drawing through the slot you have cut out

Cut a 4x6cm piece of white card and attach to the back of the image over where the buckle slot will be; just glue at the very left hand edge and allow it to hang over the foam pads but don't take the backing off the foam pads just yet!

This is the tricky stage; remove the foam pad backing from the image panel and poke the card strip on the back through the slot whilst you stick down image panel on front
This is what it now looks like from the front;

Glue the end of the small piece of card down inside - you can make the card without this little strip but it does allow the buckle to slide in and out much more easily without catching

Glue patterned paper panel to left hand inside to cover the slot and tab

Decorate the front of the card as desired; I have added flowers and tied some twine with tags round the buckle strip.

Here is the inside of the card and you can see that I added a white panel inside to write the greeting on.


I couldn't finish without a close up of the gorgeous little princess Tilda with a touch of Glamour Dust on the stars.

Card recipe;
Image: Tilda catching stars - Magnolia
DP: Sofiero - Maja Designs
Dies: Lavish branch - Memory Box

Copic colours;
Skin: E0000/000/00/21/11
Hair: E50/51/53/31/43
Dress / crown: RV000/R81/83/85
Wand: E31/43 & RV0000/000/R81
Socks: RV000/R81/blender
Shoes: W00/0/1/2/3
Ground: W00/0/1/2

This card was made for my niece's birthday; I hope she is still into pink!

Thanks very much to the Top Tip Tuesday team for letting me join in and do pop over to see all their lovely creations :-)
The challenge is being sponsored by the very sweet Sami Stamps so I do hope you can join in for a chance to win.

Thanks for visiting and I really appreciate any comments that you leave,

Hugs,
Kat xx

Challenges I am entering;
1.  Cute Card Thursday (floral delights)
2.  Sweet Magnolia (girls only)
3.  Tilda's Town (flowers)
4.  The Ribbon Girl (Magnolia only - girly)
5.  A Creative Romance (spring flowers)

Saturday, 24 August 2013

Tutorial - stitching

Hello lovely people,

I have had quite a few comments/queries about my stitching so I thought I would share a little photo tutorial on how I do it.
If you're not interested please feel free to skip on down to my Totally Gorjuss DT post below; I will not be remotely offended!

First off, I do the stitching by hand ... ok, maybe that's obvious because if I used a machine then a tutorial would be rather pointless!

Here's what I use: a cutting mat, a Tonic Studios Tim Holtz pokey tool (the rubber on this started flaking almost immediately but it works fine), a fine needle and some DMC white embroidery thread;

I start in one corner and poke holes about half way along, the spacing is by eye;

Then I start from the other corner and poke holes towards the ones I have already done.  I stop when the gap looks the right size for 3 more holes;

I add the hole in the middle of the gap;

Finally I fill in the 2 remaining holes either side of the last hole I made.  This seems to mostly avoid having the wrong size gap at the end, although I have been known to get it wrong!

For the stitching part I do backstitch with a fine needle;

I tape the ends down on the back although I realise now that my tape is almost invisible!

I also cheat!  If I know I am going to be covering some of the lower layers up then I don't bother to stitch the non-visible parts :-)

Since I do a lot of this just by 'what looks right' I appreciate it may be a bit daunting for some, but I like doing it by hand and trust me, you get a lot better with practice.  Besides, I reckon it looks better if it isn't too perfect!

I hope you enjoyed my little tutorial and happy stitching :-)  Oh, and if you want to see the finished article it's below this post.

Thanks for visiting,

Hugs,
Kat xx