Showing posts with label Odd dog. Show all posts

Thursday, 24 November 2016

Odd Dog with flowers

Hello lovely people,

I am hoping to have a productive crafting day today but first I have a little DT project to share with you.


It's time for a new challenge at In The Pink and our theme is...

CUTE AND CUDDLY
Don't forget we want to see more pink than any other colour!

Our fabulous sponsor this time is the fabulous Dies to Die For with a £10 voucher

I used a fair few new bits of stash on this card, which I always love to do.  The papers are old but new to me, and the frame and flower dies are new too :-)

Pink card with die cut details and LOTV image 'Odd Dog - bunches of love'

Odd dog is most definitely cute and cuddly and you can find this image plus loads more gorgeous new Odd Dog digis over at LOTV :-)

For this card I printed the digi image quite small but you can see that it still looks great on a standard 14.5cm square card.

Pink card with die cut details and LOTV image 'Odd Dog - bunches of love'


If you haven't already done so then do pop over to In The Pink and check out the gorgeous creations from the rest of the Pink Ladies.

Thanks for visiting and I really appreciate any comments that you leave,


Card recipe;
DP: Paris flea market - Pion Design
Dies: Greek Island collection (Rhodes) - Sue Wilson for Creative Expressions, Flower mix - Craft Emotions

Copic colours;
Odd dog: W00/0/1 & E31/35
Flowers / bow: R20/21/32
Flower centres: Y32/35
Stems: YG95/97
Ground: YG93/95/97

Monday, 21 November 2016

Many Odd Dogs!

Hello lovely people,

Here we are on Monday morning again but I have something that might just brighten your day a little :-)

As you may know, LOTV are gradually making many of their images available as digis and today sees the release of the adorable Odd Dog digis.  There are a whopping 21 images to choose from including many that have never been released before!

I love being able to re-size the digi images and for this pair of cards I made them 6cm tall so I could make cute notelet style cards which are just 8.5 x 11.5 cm.

This Odd Dog with his mug of coffee/tea was one of my faves from the rubber stamp collection.


Alongside an old favourite I thought I'd show you one of the brand new images which I really loved.


You can go and check out the fab selection of Odd Dogs over at LOTV and of course, the rest of the DT will be showcasing more images for you.

Oh, and I haven't even mentioned that you get a cute sentiment with each image too! (which I didn't use for these cards but I will have more later in the week...)

I wish you all a great week even if you are working!

Thanks for visiting and I really appreciate any comments that you leave,


Card recipe;
Images: Odd Dog digis - LOTV
DP: from stash

Copic colours;
Odd Dog: W00/0/1 & E31/35
Mug: R81/83/85
Stool: E42/43/44
Flower: YR21/Y17/Y38 & YR18
Stem / leaf: YG61/63
Ground: W00/0/1

Monday, 1 February 2016

Romantic stepper card with tutorial

Hello lovely people,

Gosh, doesn't time fly?!
I intended to post this over the weekend but got carried away with other things...all good!
I hope you all had a lovely weekend whatever you were up to :-)

I have another stepper card to share with you and this time I have done a tutorial to go with it.
I am also showing off some lovely LOTV products on this card as part of the Design Collective.

So, first up I'll show you the finished card and then I'll get into the tutorial.

Romantic fancy fold card featuring dog with balloon (image from LOTV)

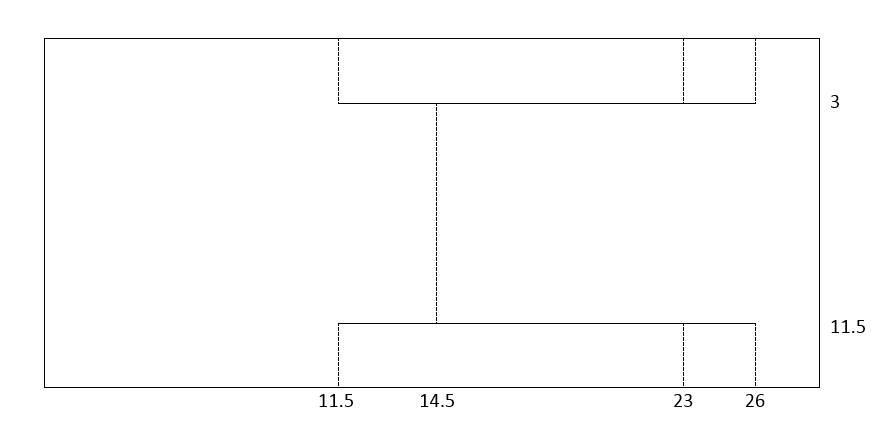
I started with a 14.5 x 29cm rectangle of card, and the picture below shows where I made the scores (dashed lines) and cuts (solid lines).

I always start by making little marks on all four edges of the back of the card (what will be the inside) at the indicated measurements on the picture.

Then I make the 2 cuts (the solid horizontal lines) with a craft knife and finally I score the other lines with a very ancient metal toothpick...but I guess any scoring tool that you have will be fine!

This method means that I cut and score exactly the bits that I need to and no more, so you end up with a nice complete back panel and no unsightly extra score lines.


I then gradually fold it up, starting with the middle fold and working down from there.
One of the folds (second from right hand side) is technically scored the 'wrong' way round for folding if you do all the score lines on the back, but I find it's a lot easier to score everything just on one side and just take care when folding it.

I sometimes like to get a little extra space on my central panel so for this design I cut a rectangle of white card and die cut the left and right hand sides, so the finished panel, as below, ended up about 11.5 x 13cm.


I cut rectangles of DP just slightly smaller than the side and bottom panels so a little white border is visible.
As usual, all the panels were inked and stitched.

I wrapped the bottom panel with twine before I attached it.
Now, I've been asked a few times how I attach twine and my main tip is just to fray the end of the twine first so it lays a bit flatter, then I simply tape it down!
Like so...


I then added the pink heart panel and image panel, sliding them under the twine.  I had to be very specific about the order in which I added the layers and twine so I could get the twine on top of the image!

Romantic fancy fold card featuring dog with balloon (image from LOTV)

And I can't finish without a close up of the adorable dog, which Dr. Hubby says is entirely unrealistic because dogs don't have opposable thumbs so there is no way he could hold on to the balloon - lol!

Romantic fancy fold card featuring dog with balloon (image from LOTV)

Card recipe;
Image: Odd Dog  -Balloon - LOTV
DP: Yours truly - Pebbles
Tag: Sentiment tags - LOTV
Dies: Heart flower lace - Magnolia Doohickeys, Heart stems - Impression Obsession
Sentiment:

Copic colours;
Dog: W1/2/3/4/5
Ligt patches on dog: W00/0/1
Shading on balloon: RV34 & blender

The stepper card is not the fanciest of fancy folds but it's one I really like and I hope some of you may find something of use in my tutorial, so thanks for reading :-)

Thanks for visiting and I really appreciate any comments that you leave,