Thursday 24 April 2014

Mother's Day James

Hello lovely people,

I don't know about you but the days off at Easter and then my usual day off yesterday has left me very confused about what day of the week it is right now.
So, in case anyone else isn't sure, it is THURSDAY so that means it's time for a new challenge at Crafty Little Fairies and our theme is...

FURRY FRIENDS

We are sponsored by...


My favourite furry friend has to be the adorable James from LOTV and this is the card I made for my Mum for Mother's Day.  It's a fairly simple design, made before my new stash of flowers arrived, but I  wouldn't have added flowers anyway as it really doesn't need anything else IMHO.


I kept the shading quite light on James and paper pieced the heart adding a different little scrap for the patch.  I wasn't sure how well it would work given the placement of his paws on the heart but a little care with the cutting out and it's all fine!


Card recipe;
Image: James - big heart - LOTV
DP: Vintage autumn basics - Maja Designs
Swirl: Leaf and swirl die - Magnolia Doohickey
Twine: ivory button twine - The Ribbon Girl
Tags: Sentiment tags (set 24 & set 69) - LOTV

Copic colours;
James: E41/42/43/44
Rose: R39/59/89 & YG97/99
Ground: T 0/1/2/3/4

If you pop over to Crafty Little Fairies you can check out the fabulous creations from my teamies.  Don't forget that from next week our challenge goes monthly!

Thanks for visiting and I really appreciate any comments that you leave,

Hugs,
Kat xx

Monday 21 April 2014

Happy 10th Birthday LOTV!

Hello lovely people,

I took the opportunity of the extra crafting time over the Easter break to make a card to celebrate LOTV's 10th birthday and for a couple of challenges.  I decided on a shabby chic look so the edges of the DP have been distressed, inked and stitched.  I also stamped a little scroll detail in 2 corners.


I experimented with a few new things on this card, one of which was adding a little pull-out tag.  Its a great way to add an extra little message and makes the card more interactive :-)


I also added lots of pretty flowers and another first for me... some pins to add to the shabby chic look.


This is one of the older LOTV stamps in my collection but I like to go back and make sure the older ones get loved too!
Of course, the shabby chic feel wouldn't be complete without a little scattering of Frantage so that's in there too!


Card recipe;
DP: Vintage summer/autumn basics - Maja Designs
Flowers: all from Wild Orchid Crafts
Seam binding / twine: The Ribbon Girl
Large tag: cut by hand and letters are a Quick Kutz die alphabet

Copic colours;
Skin: E0000/50/000/51/21 & R30
Hair: E42/43/44
Cake: YR30/E81/E41
Top / candle: B41/91/93/95
Skirt / cake icing: RV91/93/95
Flame: Y21/23/YR23
Wings: RV0000/000/91/93
Ground: T0/1/2/3/4

I hope you are all having a lovely Easter weekend :-)  I have been up to my parents with Dr Hubby and my brother and his girlfriend were there too.  We had a lovely time including an Easter egg hunt - you are never too old for one of those!  Ooh, and I made some mocha cupcakes decorated with mini eggs...yum!


Thanks for visiting and I really appreciate any comments that you leave,

Hugs,
Kat xx

Challenges I am entering;
1.  LOTV (10th birthday card)
2. Inky Chicks (shabby chic)
3.  Bunny Zoe's Crafts (distress)

Thursday 17 April 2014

Read all about it

Hello lovely people,

It's time for a new challenge at In The Pink and our theme this month is...

DIGITAL DELIGHT

So, we want to see you use a digital image and as an extra treat this time we are sponsored by the fabulous All Dressed Up Stamps!

Prize = 2 digi images of the winner's choice

No surprises then that my card features a gorgeous All Dressed Up image :-) I have been delving into my new stash of flowers again as you can see and I think it looks like she is sitting in the garden reading... and well she might with all this lovely sunny weather!


I do enjoy reading especially in the garden in the summer... now I just need to get myself a fabulous pink hat like this little lady!


Card recipe;
Image: Little Bookworm - All Dressed Up
DP: Sofiero - Maja Designs
Label shape: cut with Cricut
Flowers: all from Wild Orchid Crafts
Leaves: Leaf and swirl die - Magnolia Doohickey
Twine: Ivory button twine - The Ribbon Girl
Tag: Sentiment tags (set 24) - LOTV

Copic colours;
Skin: E0000/50/000/51/21 & R30
Hair: E42/43/44
Dress / hat: R81/83/85
Bow: B0000/000/00
Stool: E40/41/42
Book: T0/1/2/3 & YR30/E40
Ground: T0/1/2/3/4

Do pop over to In The Pink and check out the gorgeous creations from the rest of the Pink Ladies.  They have all been showcasing All Dressed Up images so be ready for overload of cuteness!

Thanks for visiting and I really appreciate any comments that you leave,

Hugs,
Kat xx

Challenges I am entering;
1.  Wild Orchid Crafts (use 3 different types of flower)

Tuesday 15 April 2014

Spring flowers

Hello lovely people,

This is my second post today so if you are looking for my guest DT card for A Little Bit Crafty then please scroll down :-)

It certainly feels to me like Spring is well and truly here with all this lovely sunshine and everything growing away in my garden, so now I have to split my time between gardening and crafting.  What about the housework?  Hmm, best not go there!

Anyhoo,  we have a new challenge for you at All Dressed Up and our theme is...

SPRING

I bet you never would have guessed that with all my waffle about Spring at the start of this post ;-)
I've gone for pretty spring shades and flowers... oooh yes, those flowers are from my newly acquired (and quite enormous!) stash of WOC flowers.  I got all sorts of types, sizes and colours and am having lots of fun using them :-D


Of course, I will just have to share a closer look at this little cutie.  There is a touch of Stickles too but in very small dots so it's mostly invisible in the photos!


Card recipe;
Image: I love my puppy - All Dressed Up
DP: Vintage Spring Basics - Maja Designs
Fancy edge: Martha Stewart edge punch
Seam binding: Lilac - Wild Orchid Crafts
Flowers: all Wild Orchid Crafts
Memo pin: all my own work from some wire!
Sentiment: generated on computer

Copic colours;
Skin: E0000/50/000/51/21 & R30
Hair: E35/37/47
Dress / headband: V20/22/25
Leggings: W00/1/2
Dog: W00/0/2/4/6
Flowers: Y21/23/35/38 & V20/22/25 & YR30/21/23
Leaves: YG61/63
Grass: YG61/63/67

Do pop over to All Dressed Up to see the fabulous creations from the rest of the Dressy Girls and we'd love to see you join in for a chance of winning 3 images of your choice!
Don't forget to swing by our Facebook Group to share your creations and chat to fellow All Dressed Up lovers :-)

Thanks for visiting and I really appreciate any comments that you leave,

Hugs,
Kat xx

Challenges I am entering;
1. Divas by Design (Spring/Easter)
2.  As You Like It (fave stitching - real or faux... no contest for me, it has to be real for the texture and the way it makes my layers look 'finished'!)
3.  A Creative Romance (Spring/Easter)
4.  Sweet Stampin' (flowers)
5.  A Gem of a Challenge (Spring is in the air)

Happy bird-day!

Hello lovely people,

It's a flying post from me this morning as I very nearly forgot to write it - oops!  I am continuing my guest DT spot at A Little Bit Crafty and have a mid-way reminder of our current challenge which has the theme...

THE BIRDS AND THE BEES

Since I did bees last time I have gone for birds on this card and brace yourselves, it's a bright one!


The image is part of a set from Digi Stamp Boutique so I have some other cute images to use another time.  I added some Stardust Stickles to the hats and the fun sentiment comes with the images :-)


Card recipe;
DP: XOXO - American Crafts
Loopy edge: Martha Stewart border punch
Buttons: from stash

Copic colours;
Pinks: R81/83/85
Greens: G000/00/BG34
Yellows: Y15/17/38
Beaks: YR14
Ground T0/1/2/3/4

If you pop over to A Little Bit Crafty you can check out the fabulous creations from the DT.

Thanks for visiting and I really appreciate any comments that you leave,

Hugs,
Kat xx

Challenges I am entering;
1.  ABC (J is for just as you like)
2.  That Craft Place (anything goes/Easter)

Sunday 13 April 2014

Spring Tilda

Hello lovely people,

What a fabulously sunny weekend we have had!  I enjoyed spending time with friends including a lovely long walk and some fantastic food :-)
So, not too much crafting time but I just had to sneak a bit of space into my schedule to have a quick play with one of my newly acquired Magnolia stamps.


It's a fairly CAS creation from me today and I felt this sweet image lent itself to a Spring-themed card.  There's so much green stuff popping up in my garden at the moment so the pretty green DP seemed the perfect choice.


Card recipe;
Image: Tilda watering - Magnolia
DP: Sofiero & Vintage Spring Basics - Maja Designs
Sentiment: So wordy sentiments - Amy R

Copic colours;
Skin: E0000/50/000/51/21 & R30
Hair: E41/42/43
Top / shoes: G40/YG61/G21/G94
Trousers: E81/84/87
Watering can: T0/1/2/3/4 and inside T3/4/6
Headscarf: T0/1/blender and greens as for top

Thanks for visiting and I really appreciate any comments that you leave,

Hugs,
Kat xx

Challenges I am entering;
1.  Papertake Weekly (Spring has sprung)
2.  Sweet Magnolia (Spring)
3.  Tilda's Town (Easter/Spring)
4.  Diva's by Design (Easter/Spring)

Thursday 10 April 2014

Button up!

Hello lovely people,

Yes, it is Thursday once again (where does the time go to?!) so we have another challenge for you at Crafty Little Fairies and our theme this time is...

BUTTON UP!

This week we are sponsored by the wonderful Whiff of Joy...

Prize - stamp of winner's choice


I am continuing with my attempt to do more male designs and my first choice for men/boys is always the fabulous LOTV.  I had the perfect paper pad to team with this image and used some twine to add a little texture and interest.


Aw, I just love this little chap with his HUGE boat, which was just crying out for some paper pieced sails to give a nice co-ordinated look.  Oh and yes, getting the twine stuck down how I wanted was proper fiddly but I do like the end result!


 Card recipe;
Image: Sailing Boat - LOTV
DP: By the sea - Maja Design
Sentiment: Happy Circular Sentiments (set 8) - LOTV
Buttons / twine: from stash

Copic colours;
Skin: E0000/50/000/51/21 & R30
Hair: E40/41/42/43
Shirt: B21/23/24
Trousers: B95/97/99
Shoes: E42/43/44/47
Boat: T0/1/2 & B95/97/99
Ground: T0/1/2/3/4

Head over to Crafty Little Fairies to check out the lovely creations from my teamies.  I have loads of buttons in my stash and bet you do too so I hope you will join in with our challenge :-)

Thanks for visiting and I really appreciate any comments that you leave,

Hugs,
Kat xx

Challenges I am entering;
1.  That Craft Place (buttons)

Sunday 6 April 2014

Music to my ears

Hello lovely people,

Woohoo, it's new release time at All Dressed Up and once again we have an amazing selection of images for you.  Just feast your eyes on this lot...

Easter Bunny

Just So Cool

Little Flower Girl

On My Farm

I have used Just So Cool and gone ultra-CAS this time.  I used Paint Shop Pro to add a few extra musical notes to the image and merged in a different sentiment.


This cool chick certainly looks lost in the music!


Copic colours;
Hair: E35/37/47
Top / shoes: R0000/000/00/01
Waistcoat: T2/4/6
Jeans: B95/97/99
Belt: E37/47/49
Scarf / heart: R30/32/35
Headphones: T6/8/10/100
Ground: T0/1/2/3/4

Do pop over to All Dressed Up to see what the rest of the Dressy Girls have created; they are all stunning! While you're there, check our our current 'Monochrome' challenge and we'd love to see you join in for a chance of winning 3 images of your choice!
Don't forget to swing by our Facebook Group to share your creations and chat to fellow All Dressed Up lovers :-)

Thanks for visiting and I really appreciate any comments that you leave,

Hugs,
Kat xx

Thursday 3 April 2014

Wanna dance?

Hello lovely people,

I think I'm on a roll after posting 2 cards on Tuesday and I was crafting up a storm yesterday on my day off!  But today it's all about a new challenge at In The Pink and our theme is...

ANYTHING BUT SQUARE (and no rectangles either!)

I have used my favourite (ok, my only) large shaped Go Kreate die for the base shape... must get my hands on some more of these!


I also used a new Saturated Canary image that came on a CD-ROM with a magazine and has been on my 'must colour' list for a while now.


Card recipe;
DP: XOXO - American Crafts & Back to Basics - Bo Bunny
Shabby white Frantage
Sentiment: Kaisercraft clear mini stamp set
Dies: Precious stars - Memory Box

Copic colours;
Skin: E0000/000/50/51/21 & R30
Hair: E57/59/49
Eyes: E55/57
Lips: R30/32
Tutu / shoes: R81/83/56
Leotard: W7/9/100
Ground: W0/1/2/3

I thoroughly recommend a visit to  In The Pink to check out the fabulous shaped creations from my teamies; they really are wonderful :-)

Thanks for visiting and I really appreciate any comments that you leave,

Hugs,
Kat xx

Challenges I am entering;
1.  Simon Says Stamp (happy birthday)
2.  Divas by Design (anything goes)

Tuesday 1 April 2014

What's the buzz?

Hello lovely people,

I said I had two projects to share today (check out my other post for Top Tip Tuesday here) and I'm thrilled to say that the second is another guest DT spot...
A Little Bit Crafty DT Blog
So, I'm joining in with A Little Bit Crafty where our theme this month is...

THE BIRDS AND THE BEES

No, no, not like that, we want to see actual birds and/or bees please!

This was the perfect excuse to use some cute Pink Petticoat digi images and create a little boxed set of notelets.


I created 2 pockets on the inside with each one holding 3 extremely CAS notelets plus envelopes.


Each notelet has a different sentiment and I simply coloured the bees with Copics (Y18, B0000) then added a tiny gem detail to finish.


Ok, just one more shot of it all tied up with pretty organza ribbon...


Card recipe;
DP: Park Bench - Echo Park
Flowers: Wild Orchid Crafts
Gems: from stash

Do pop over to A Little Bit Crafty to see all the other fabulous creations and thank you peeps for letting me join in the fun :-)

Thanks for visiting and I really appreciate any comments that you leave,

Hugs,
Kat xx

Challenges I am entering;
1.  Wild Orchid Crafts (bling it up)
2.  Papertake Weekly (anything goes)

Buckle up!

Hello lovely people,

Today I have TWO projects to share with you and look what is first up...


Yep, that's right, I'm super excited to be doing a guest DT spot at  Top Tip Tuesday and the theme this time is...

CUTE

I was asked if I would do a tutorial and I knew straight away that I wanted to share how to make a buckle card.
I first saw this type of card here on Lyndsey's blog and just had to have a go myself, so here's a little look at what the finished card looks like...


And here's how to make it...

Cut a 4cm strip from the front right hand side of a 145cm square base card and save the offcut strip for later

Cut a panel of patterned paper to fit the front of the card and 2 panels to fit the inside of the card, leaving a small white border.  If desired, ink and stitch round the edges of all the panels

Glue the patterned paper panel to the front of the card

Take the offcut strip from step one, round the corners at one end then score and fold at 9cm from this end. This will form the 'buckle' strip.

Cut a small panel of patterned paper to fit the front of the buckle leaving a small white border, inking and stitching edges if desired.  Glue panel to buckle strip.

Inside the card mark out a slot roughly 4mm wide on the left hand side 4cm up from the bottom and 3cm from the left hand edge and cut out with a craft knife; the exact size and placement of the slot is not crucial and can be adjusted to fit where you would like it underneath the image

Attach buckle strip to right hand side 4cm up from the bottom so that the fold line of the buckle lines up with the right hand edge of the card and will fold neatly over the front of the card when closed

Glue patterned paper panel to right hand inside to cover the buckle

Stamp and colour image, trim to size and mat onto a piece of Kraft card. Cover back of image panel with foam pads or tape except for where the buckle will pass behind it; you can mark out where the slot will be by placing the image panel on the front of the card and drawing through the slot you have cut out

Cut a 4x6cm piece of white card and attach to the back of the image over where the buckle slot will be; just glue at the very left hand edge and allow it to hang over the foam pads but don't take the backing off the foam pads just yet!

This is the tricky stage; remove the foam pad backing from the image panel and poke the card strip on the back through the slot whilst you stick down image panel on front
This is what it now looks like from the front;

Glue the end of the small piece of card down inside - you can make the card without this little strip but it does allow the buckle to slide in and out much more easily without catching

Glue patterned paper panel to left hand inside to cover the slot and tab

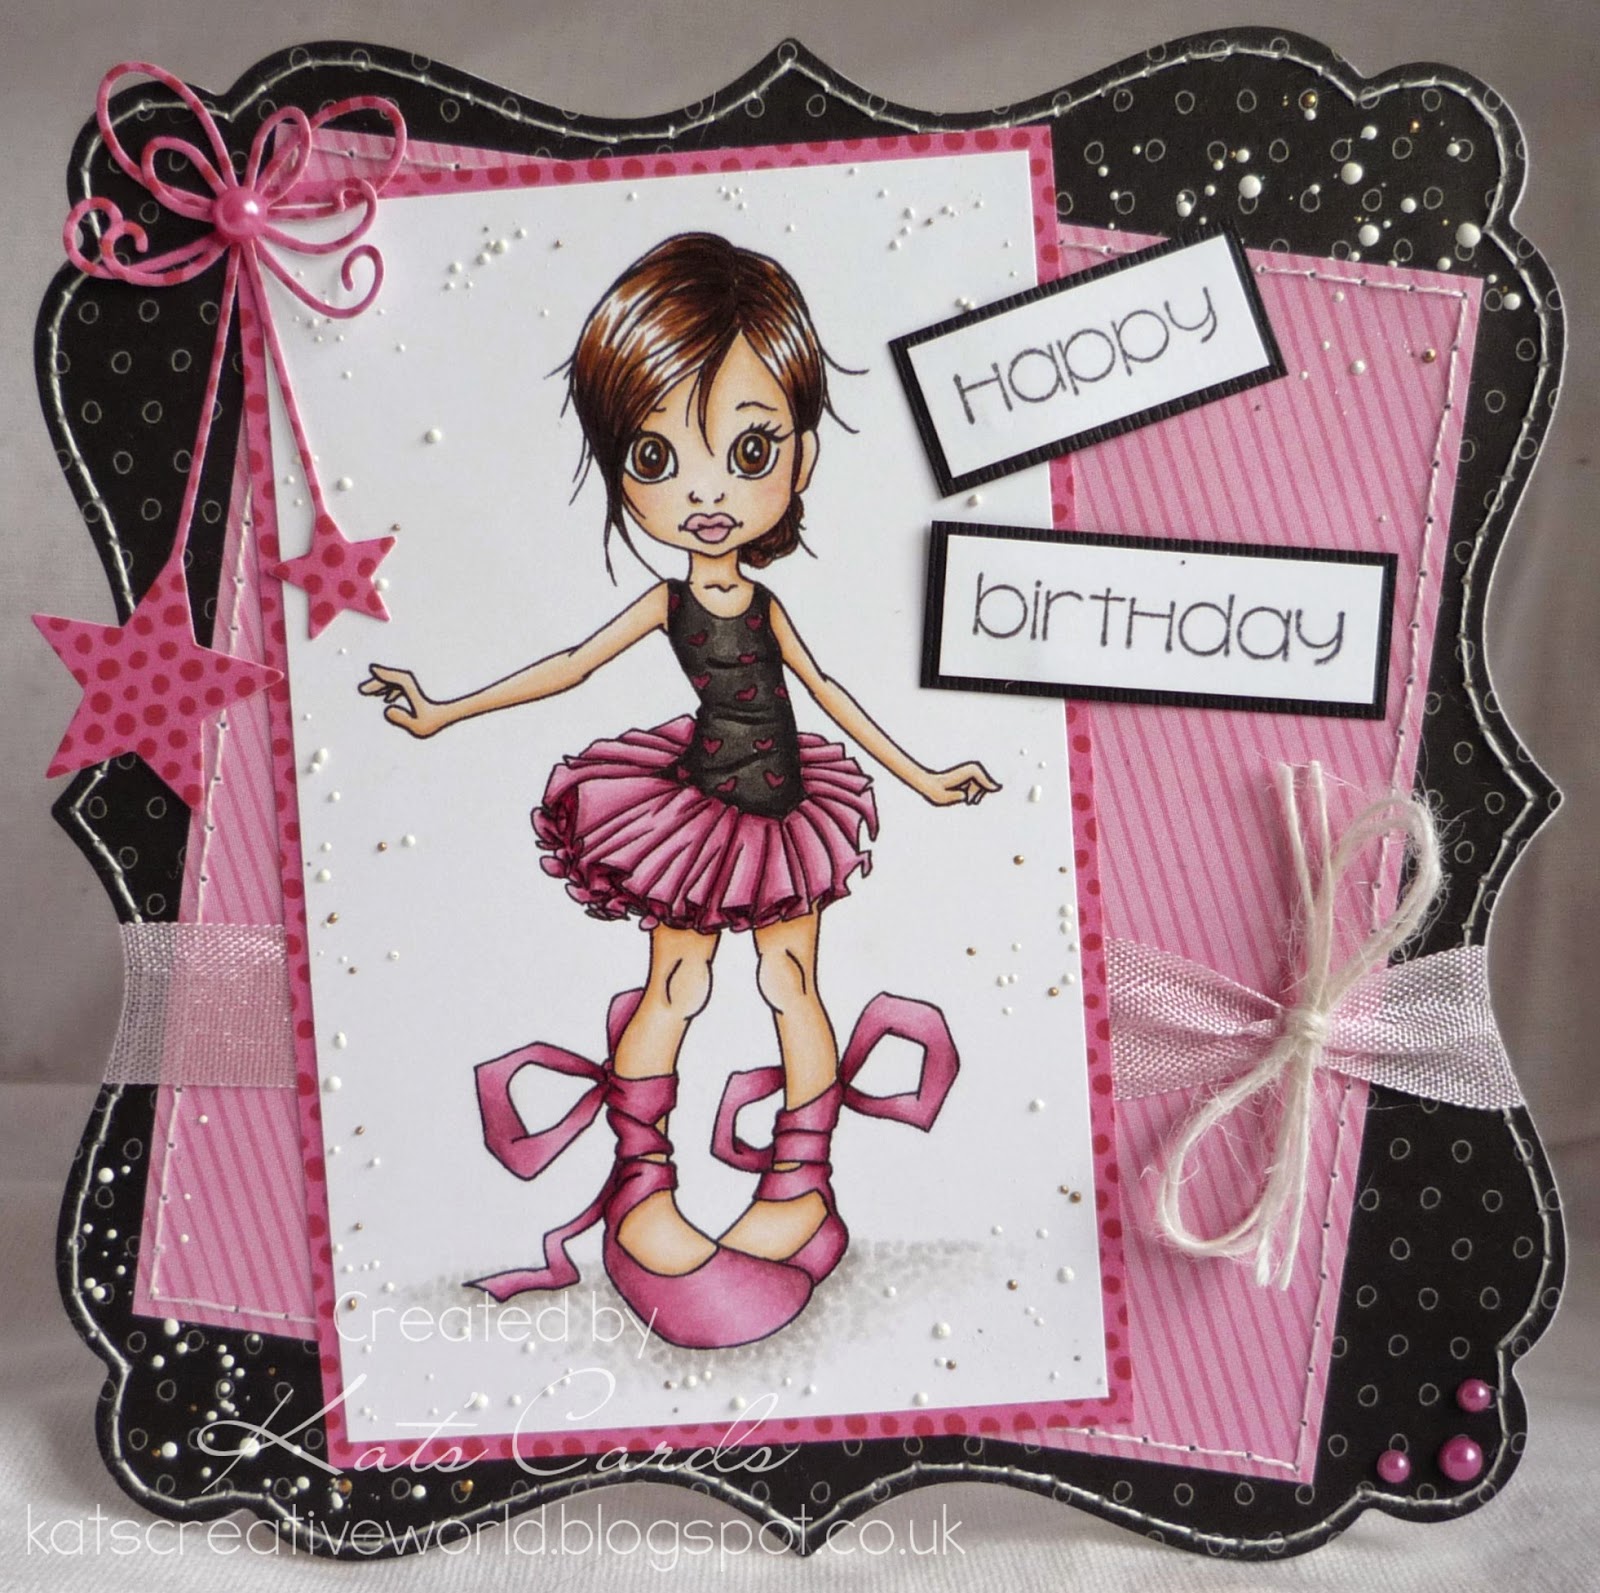
Decorate the front of the card as desired; I have added flowers and tied some twine with tags round the buckle strip.

Here is the inside of the card and you can see that I added a white panel inside to write the greeting on.


I couldn't finish without a close up of the gorgeous little princess Tilda with a touch of Glamour Dust on the stars.

Card recipe;
Image: Tilda catching stars - Magnolia
DP: Sofiero - Maja Designs
Dies: Lavish branch - Memory Box

Copic colours;
Skin: E0000/000/00/21/11
Hair: E50/51/53/31/43
Dress / crown: RV000/R81/83/85
Wand: E31/43 & RV0000/000/R81
Socks: RV000/R81/blender
Shoes: W00/0/1/2/3
Ground: W00/0/1/2

This card was made for my niece's birthday; I hope she is still into pink!

Thanks very much to the Top Tip Tuesday team for letting me join in and do pop over to see all their lovely creations :-)
The challenge is being sponsored by the very sweet Sami Stamps so I do hope you can join in for a chance to win.

Thanks for visiting and I really appreciate any comments that you leave,

Hugs,
Kat xx

Challenges I am entering;
1.  Cute Card Thursday (floral delights)
2.  Sweet Magnolia (girls only)
3.  Tilda's Town (flowers)
4.  The Ribbon Girl (Magnolia only - girly)
5.  A Creative Romance (spring flowers)