Wednesday 31 December 2014

Under the tree

Hello lovely people,

I hope you all had a wonderful Christmas with your loved ones and that you all have a few new crafty toys to play with!
I had a fab and very busy time which is why I haven't been around to visit you much but I'm back into the usual routine now and will be popping by very soon!

Christmas may be over for another year but I still have a few more Christmas cards to share with you!


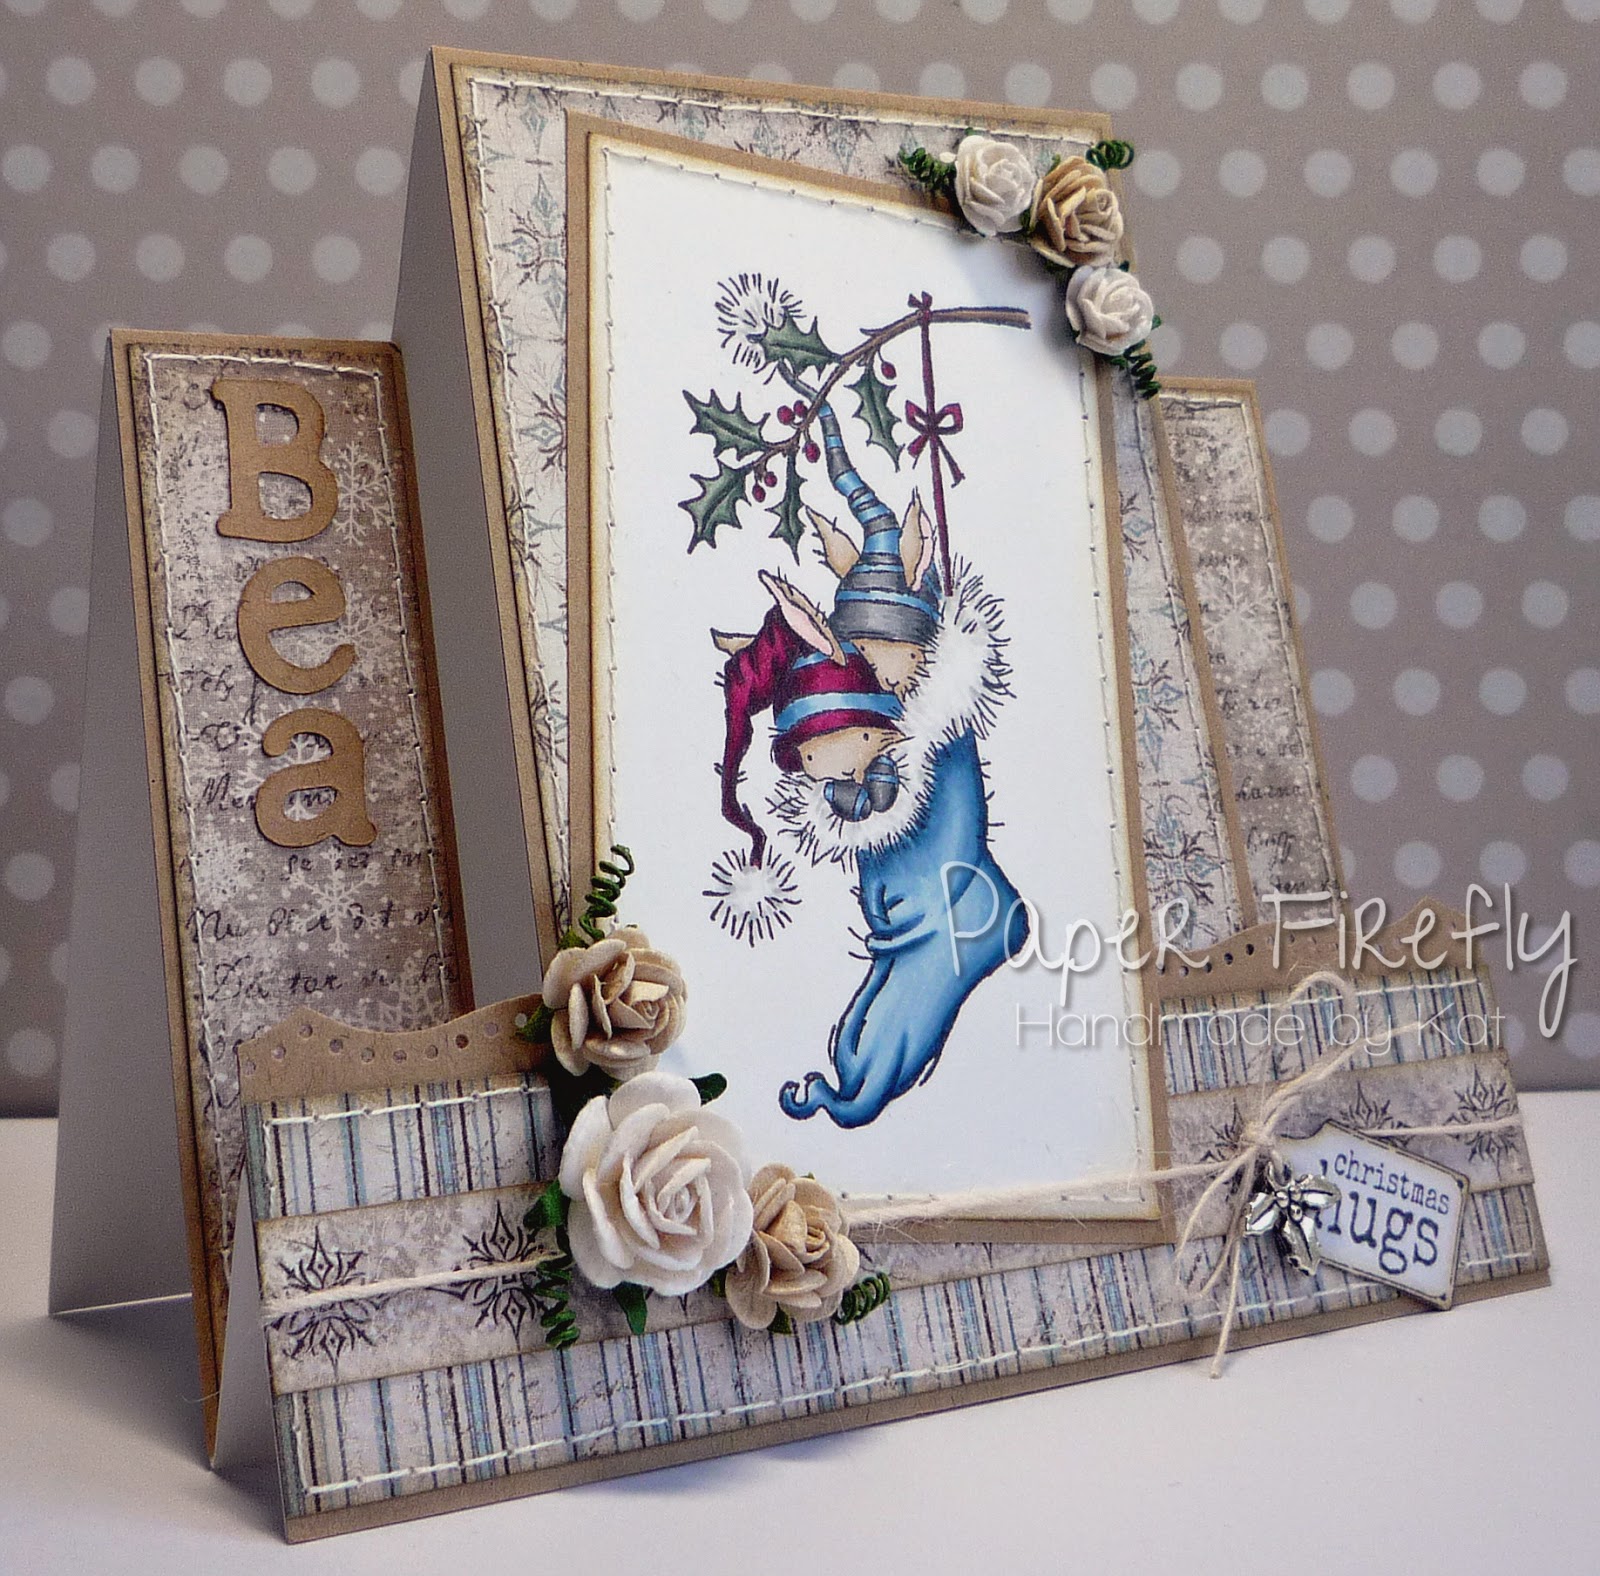
I know I have already shown you several cards with this image but it really is my favourite as it works on all styles of cards; male/female, fancy/CAS.  Oh, and it is soooo cute!


Card recipe;
Image: from LOTV but discontinued
DP: Vintage frost basics - Maja Design (available from Live and Love Crafts)
Tag: Christmas sentiment tags - LOTV
Letters: cut on Cricut

Copic colours;
Skin: E000/00/21/11/04 & R20
Bunnies: E41/42/43 & R000/00/01 for ears
Mice: W00/1/3
Tree: G40/YG63/G94/G99
Blanket / stocking: B91/3/5/7
Red stockings / blobs on tree: R46/39
Stars on tree: YR30/31

I wish you all a happy and healthy 2015!

Thanks for visiting me and for all the lovely comments left over the past year; I appreciate it so much :-)


Challenges I am playing along with;
1.  Inky Chicks (winter wonderland)
2. Simon Says Stamp (anything goes)
3.  Cute Card Thursday (anything goes)
4.  As You Like It (fave Christmas image, as above)
5.  Sweet Stampin' (anything goes)

Tuesday 23 December 2014

Gift box

Hello lovely people,

It's time for a new challenge at Top Tip Tuesday and our theme this time is...

MAKE YOUR OWN

So, we want to see something you have created from scratch, maybe an embellishment or special papercraft item - get creative!  And don't forget to tell us what you have handmade in your blog post!

Our sponsor this time is Bugaboo with a fab prize...

I have made my own gift box to present some sweet treats in.


I didn't have a template, I just decided what size box I needed and built up the sides of the box with 2 layers of cardboard to make it really sturdy.


I left some small flaps at the bottom of the box so it could be attached to the base then covered the inside of the base with another piece of card.
I decorated the sides with pretty paper, some die cut corners, lace, twine and flowers.


Then the naughty bit...some salted caramel mocha fudge to go inside...mmmmmm!
If I've tempted you to have a go at making some of this delicious fudge yourself then you can find the recipe here!


Box recipe;
DP: Vintage spring basics - Maja Design (available from Live and Love Crafts)
Lace: from stash
Die: Filigree corner - La La Land

I hope you will pop over to Top Tip Tuesday and check out the fabulously creative projects from the rest of the team and there are some great tips for you too :-)

Thanks for visiting and I really appreciate any comments that you leave,


Thursday 11 December 2014

Lots of layers

Hello lovely people,

It's time for a new challenge at In The Pink and our theme this time is...

PINK CHRISTMAS

Ha ha, yes we are soooo predictable but you know you love it!

I've gone to town on the layers here... I just couldn't decide which papers to use so I used them all!


It's been a while since I used an All Dressed Up image but this is one of my favourites especially when a card for a 19 year old 'diva' is requested!


All the usual suspects are on here; the twine, the roses and those little letter stamps again!  I did throw in some extra sheer ribbon and stars as well though :-)


Card recipe;
DP: A gift for you & Vintage frost basics - Maja Design (available from Live and Love Crafts)
Dies: cosmic star set - Memory Box
Ribbon: from stash

Copic colours;
Skin: E000/00/21/11/04 & R20
Hair: E21/25/29
Tree: G40/YG61/63
Dress / bows / shoes: RV91/93/95
Stars on tree: RV91/93
Balls on tree / bows: RV69/99
Tree stand: W5/6/7

If you haven't already done so then do pop over to In The Pink and check out the gorgeous creations from the rest of the Pink Ladies.

This challenge is running for 4 weeks so plenty of time to enter with those last minute Christmas makes... it can't just be me still doing stuff surely?!

Thanks for visiting and I really appreciate any comments that you leave,


Challenges I am playing along with;
1.  A Creative Romance (anything goes)
2.  Sweet Stampin' (things with wings)
3.  The Ribbon Girl (anything goes)
4.  A Gem of a Challenge (anything Christmas)
5.  ABC (Y is for Yuletide)

Tuesday 9 December 2014

Pegs

Hello lovely people,

It's time for a new challenge at Top Tip Tuesday and our theme this time is...

INSPIRED BY SOMETHING IN YOUR HOME

This is a really lovely theme as there are so many options; something you love the colours of, an object that is really special to you or maybe just something really really boring that you can make into something much better...

That's what I was thinking when I stumbled upon a big bag of pegs.  Now, I don't have a washing line so haven't used these for about 10 years but I was so excited to rediscover them and had lots of ideas going through my head as to what I could do with them.


I knew exactly what colour I wanted to use (lol!) and I wanted them to have a slightly shabby chic feel with just a little cute embellishment so here's what I came up with;


I took the liberty of creating a little photo tutorial for you as I went along, just in case anyone else wants to have a go at this... and why wouldn't you?!

First I painted the pegs with one coat of white acrylic paint.  I took the pegs apart to do this so I could get into all the cracks.  I didn't worry too much about the flat outside sections as these were going to be covered by paper.


Then I cut little strips of different co-ordinating papers - use up those scraps people!


I trimmed each piece of paper to exactly the right size for each individual peg as I went along and glued them down with tacky PVA.  I put a little glue on the peg like this;


Then I spread it out with my finger so the whole area was covered and pressed the paper strip on top, smoothing it down firmly.


Now, these looked a little too pristine for my liking so I used very fine sandpaper to sand the edges of each paper strip which gives a nice finish and makes the strip kind of 'blend into' the edges of the peg.


I then put the pegs back together and added the finishing touch with a die cut flower and paper rose on each one.


I brushed some Wink of Stella over the roses which gives them a gorgeous subtle sparkle.. too subtle for the camera maybe?!


I think these would be nice with magnets on the back to pop on your fridge or maybe with drawing pins on the back so they could be pushed into a cork board.

Then you can use them to clip up anything you like...


Peg recipe;
Paint: Adirondack acrylic paint dabber (white) - Ranger
DP: Special delivery (girl) - Pebbles
Dies: Fancy blossoms - Memory box

I hope you will pop over to Top Tip Tuesday and check out what has inspired the fabulous creations from the rest of the team.

Thanks for visiting and I really appreciate any comments that you leave,


Challenges I am entering;
1.  A Little Bit Crafty (anything goes but not Christmas)

Thursday 4 December 2014

Snuggle up

Hello lovely people,

Here we go again with a new challenge at Crafty Little Fairies and very sadly, it is our last ever challenge :-(

Our final theme for you is... HOLLY AND/OR IVY

Well, it pretty much had to be another Christmas card with that theme didn't it?! 
I've done a stepper design and there is holly both on my image and the little charm I added.


These stepper designs are great for using up quite small bits of DP and I love adding a little detail to the top of the front step with a border punch.


I always add a strip of card in the centre of my stepper designs so that it can't slip open when standing so I thought I'd show you, just in case you're interested!


And this post wouldn't be complete without a close up of the sweet bunnies all cosy in their stocking.


Card recipe;
Image: from LOTV but now discontinued
DP: Vintage Frost Basics - Maja Design (available from Live and Love Crafts)
Tag: Christmas sentiment tags - LOTV
Punched edge: Cherish (punch around the page) - Martha Stewart
Kraft letters: cut with my Cricut

Copic colours;
Bunnies: E40/41/42
Hats: B91/93/95 & T3/4/6 (right) & R39/89/99 (left)
Branch: E43/44/47
Leaves: BG93/96/99
Berries / bow: R39/89/RV99
Fur on stocking/hat bobbles: T0/1/2

If you pop over to Crafty Little Fairies you can check out the beautiful creations from my teamies and details of the four prizes on offer from some fabulous sponsors.

Thanks for visiting and I really appreciate any comments that you leave,


Challenges I am playing along with;
1.  Papertake Weekly (anything goes)
2.  Simon Says Stamp (Christmas/holidays)
3.  Divas by Design (feeling festive)