Showing posts with label fairy. Show all posts

Friday, 22 September 2017

Garden fairy

Hello lovely people,

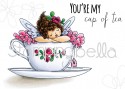
I am running a little bit late with my Dies to Die For DT card today but I think this gorgeous little fairy might be worth the wait!

Birthday card using Tiny Townie Fairy Garden Fairy by Stamping Bella

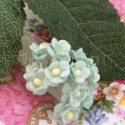
I couldn't resist creating a little layered scene for her and that meant I could include the darling little mushrooms too!

Birthday card using Tiny Townie Fairy Garden Fairy by Stamping Bella

If I've tempted you with any of the lovely supplies I've used then you can go straight to the individual products via the links at the end of my post or just pop over to Dies to Die For and have a little browse around!

Thanks for visiting and I really appreciate any comments that you leave,


Copic colours;
Skin: E000, E00, E21, E11, E04
Hair: E21, E25, E29
Skirt / hat: BV0000, BV000, BV11, BV34
Top / tights: BG11, BG 13, BG23
Wigs / tights: B21, B32, B23 (&BG0000 on wings)
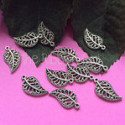
Leaves: YG11, G21, YG25
Mushrooms: C00, N0, N1, N2, N3
Mushroom spots as for lilac/blue areas of fairy

Lovely things I've used from Dies to Die For;
Tiny Townie Fairy Garden Fairy stamp set - Stamping Bella
Tiny Townie Fairy Garden Fairy die set - Stamping Bella
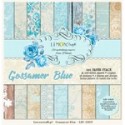
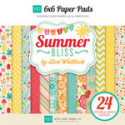
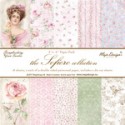
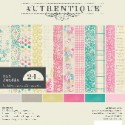
Tiny hearts pastels 6x6 paper pad - My Favorite Things 
Itsy bitsy polka dots pastels 6x6 paper pad - My Favorite Things 
Proper pinstripes pastels 6x6 paper pad - My Favorite Things 
Stitched mini scallop circle STAX - My Favorite Things 
Stitched hillside borders - Lawn Fawn
More Essential Sentiments - My Favorite Things

Sunday, 3 September 2017

LOTV: Fairy Post

Hello lovely people,

I'm back as promised with another sneak peek of one of the brand new LOTV Christmas images, and it's release day tomorrow!

Yesterday I had a very traditional feeling Christmas card but today is a totally different kettle of fish with bright colours and a more modern feel.

Colourful Christmas card using Fairy Post stamp by LOTV

These little fairies were probably the first image I wanted to colour from this release...adorable doesn't even begin to cover it!

Colourful Christmas card using Fairy Post stamp by LOTV

Again, I've opted for a simple design because that image really needs to take centre stage, but I had just the perfect little embellishment in the form of the letters from an MFT mailbox die set...too cute!

The sentiment is from the recently released Snowflakes and Christmas Trees LOTV set which contains several cute sentiments which are perfectly sized for fishtails and you know I love a fishtail banner, right?!

Colourful Christmas card using Fairy Post stamp by LOTV

That's not the end of it because there are just so many images in this release that I wanted to play with so I'll have yet more to show you tomorrow on release day :-)

Thanks for visiting and I really appreciate any comments that you leave,


Lovely things I've used;
Fairy Post digi stamp by LOTV
Snowflakes and Christmas Trees by LOTV
Merry and Bright 6x6 paper pad by Carta Bella
Large Frilly Frames #10 by Go Kreate
Circle dies by Tonic Studios
Inside and out stitched rectangle STAX by My Favorite Things
Mailbox Dienamics by My Favorite Things
Fishtail banner from one of the MFT Blueprints...not sure which - lol!
Crystal Glamour Dust

Copic colours;
Skin: E000, E00, E21, E11, E04
Hair: E53, E57, E59
All red sections: R35, R37, R39
All green sections: YG23, YG25, YG17
All aqua sections: BG11, BG32, BG34
Fairy wings: BG10, BG11, BG32
Shoes: T5, T6, T7
Letters: YR30, E40
Fluffy trims / pom poms: W00, T0, T1, T2
Postbox base: T4, T5, T6, T7
Blobs on top of mushroom postbox: YR30, E40, E41, E42
Ground: B0000, B000, B00, B41

Tuesday, 11 July 2017

Sweetie on Kraft

Hello lovely people,

I am so thrilled and honoured to have been designing for Papercraft inspirations magazine every month throughout 2017 but I never seem to get round to sharing my projects, so I thought it was about time I did!

In the June issue I did a Masterclass on colouring on Kraft and it was a special treat to see this as the main cover card too :-)

Shabby chic fairy card using Sweetie by Wee Stamps for Whimsy stamps, coloured on Kraft

This little fairy has always been a favourite of mine and I enjoyed the challenge of colouring her on Kraft instead of white card.

Shabby chic fairy card using Sweetie by Wee Stamps for Whimsy stamps, coloured on Kraft

This was a very 'me' style of card too, with the shabby chic finish and pretty flowers.  Lots of the goodies on here came from The Ribbon Girl and you can find all the links at the end of my post.

Shabby chic fairy card using Sweetie by Wee Stamps for Whimsy stamps, coloured on Kraft

I hope you are all having a good week :-)

Thanks for visiting and I really appreciate any comments that you leave,


Copic colours;
Skin: E000/E51/E30/E11/E13
Hair: E53/E57/E59
Flowers / tunic: BG02/BG05/BG07
Wings / bottom of tunic: BG0000/BG000/BG01
Leaves: G94/G99

Lovely things I've used from The Ribbon Girl;

Other card ingredients;
Sweetie - Wee stamps for Whimsy stamps
Sentiment tags - Lili of the Valley

Sunday, 18 June 2017

Sunny flower fairy

Hello lovely people,

We have a new 'Use any image' challenge starting over on The Ribbon Girl blog, so you can enter with any type of project as long as you include an image.
There are loads of fab prizes up for grabs too :-)

I have, of course, popped a few gorgeous goodies from The Ribbon Girl on here and you can find all the product links at the end of this post.

This card seems really appropriate for the beautiful sunny weather we are having in the UK right now!

Sunny floral fairy card using Echo Park papers, embellishments from The Ribbon Girl and Fairy sunny day digi image from Tiddly Inks

I cannot tell you the last time I used a Tiddly Inks image and I sooooo enjoyed colouring this cute fairy; I knew she would look lovely in sunny colours :-)

Sunny floral fairy card using Echo Park papers, embellishments from The Ribbon Girl and Fairy sunny day digi image from Tiddly Inks

I've used a pretty flower border but only wanted a little bit showing for detail, and then I added foliage with a new leafy die cut into small sections; this will be another well-used die I think!

Sunny floral fairy card using Echo Park papers, embellishments from The Ribbon Girl and Fairy sunny day digi image from Tiddly Inks

If you find yourself tempted by any of the pretty supplies I've used then you can go straight to the individual products via the thumbnails at the end of my post or just pop over to The Ribbon Girl and have a little browse around!

I hope you all have a beautiful day and can enjoy the sunshine :-)

Thanks for visiting and I really appreciate any comments that you leave,


Copic colours;
Skin: E000/00/21/11/04
Hair: E53/35/59
Dress / shoes: BG13/15/49
Band on dress / wand glow: Y13/08/19
Flower petals: Y15/17/38/YR16
Flower centres: E37/39/18
Leaves: YG23/25
Wings: BG0000/000/10/11/13
Wand: E43/44

Lovely things I've used from The Ribbon Girl;


Other card ingredients;
Fairy sunny day - Tiddly Inks
For you circular sentiments - Lili of the Valley
Floral dance Die-sire Edge'ables - Crafter's Companion
Leafy branch die 5 - Moda Scrap for Elizabeth Craft
Other flowers - from stash

Sunday, 19 March 2017

Wee fairy with flowers

Hello lovely people,

I hope you are having a wonderful weekend :-)

I had a fab time catching up with an old friend on Friday night and as this post goes live I'm guessing I might be enjoying breakfast with another couple of friends after spending yesterday evening with them...or maybe I'll still be in bed ;-)

Today we have a new 'Use any image' challenge starting over on The Ribbon Girl blog, so you can enter with any type of project as long as you include an image.
There are loads of fab prizes up for grabs too :-)

I had a lovely delivery of new goodies from The Ribbon Girl and couldn't wait to use some of them on my card...the main one being the beautiful papers.  I was delighted to see that Maja Design have re-launched the Sofiero range and you can get the 6x6 pad from The Ribbon Girl, so of course I had to have that as it was a fave of mine previously :-)

Girly pink fairy card with lots of flowers (image from Wee Stamps for Whimsy Stamps)

I realised it has been quite a while since I coloured a person with my Copics but this sweet little fairy turned out pretty well.

Girly pink fairy card with lots of flowers (image from Wee Stamps for Whimsy Stamps)


Other than the scrummy papers, the ruffle ribbon was a new addition to my collection of pink ribbons and it really is soooo beautiful :-)

I borrowed a trick from the wonderful Debs with my ribbon and instead of a bow I just cut little fishtails into the ends of a scrap of ribbon and tied it with twine.

Ooooh, and talking of details, I also replaced the yellow stamens in the cherry blossom with pink pearly ones because...well, the more pink the better, right?!

Girly pink fairy card with lots of flowers (image from Wee Stamps for Whimsy Stamps)


If you find yourself tempted by any of the pretty supplies I've used then you can go straight to the individual products via the thumbnails at the end of my post or just pop over to The Ribbon Girl and have a little browse around!

Enjoy the rest of your weekend :-)

Thanks for visiting and I really appreciate any comments that you leave,


Copic colours;
Skin: E000/00/21/11/04 & R20
Hair: E50/53/55
Dress: W00/0/1/3
Wings: RV0000/000/R81
Flowers / slippers: R81/83/85
Leaves: G40/YG61/YG63

Lovely things I've used from The Ribbon Girl;


Other card ingredients;
Flower fairies - Wee Stamps for Whimsy Stamps
Spring foliage - Suw Wilson for Creative Expressions
Other flowers - from stash

Friday, 17 February 2017

Edna takes a nap

Hello lovely people,

I intend to spend some quality time with Dr. Hubby on my day off today, so am just quickly popping in with my Dies to Die For DT card.

My last few DtDF cards have been pretty CAS but I felt that Edna deserved something a little fancier!

These papers are truly gorgeous; it's a real treat when you find a pad where you can see yourself using every single design :-)

That's actually why this card didn't end up properly fancy with flowers etc. because I couldn't bear to cover the gorgeous papers - lol!

Clean layered card with fairy in teacup (image from Stamping Bella)

I loved using my Inktense pencils for this card but am also quite excited to colour Edna with Copics too, just for comparison.

I planned for the teacup to be white, but wanted to keep it really vintage looking, so tried out a very pale shade of brown rather than grey and I think it really worked :-)

Clean layered card with fairy in teacup (image from Stamping Bella)

You wouldn't believe how long I faffed around trying to find the perfect sentiment for this card...and then I ended up using one of my most-used sentiment sets...ho hum, I am so predictable!

I also made some tiny fishtail banners because I wanted to make use of the even the tiny scraps of pretty papers and they added a cute detail since I wasn't using any other embellishments.

Clean layered card with fairy in teacup (image from Stamping Bella)

If I've tempted you with any of the lovely supplies I've used then you can go straight to the individual products via the thumbnails at the end of my post or just pop over to Dies to Die For and have a little browse around!

Thanks for visiting and I really appreciate any comments that you leave,


Inktense colours;
Skin: Baked earth, Madder brown, Saddle brown
Hair: Tan, Willow, Oak
Feather boa / flowers: Crimson
Leaves: Leaf green
Wings / tag: Mallard green
Teacup: Sepia ink
Ground: Ink black

Lovely things I've used;

Other card ingredients;
Filigree corner - La La Land

Thursday, 19 January 2017

Little flower fairy

Hello lovely people,

This is hump day for me after my usual Wednesday off and already I can't wait for the weekend to come around!

I was feeling a little mojo-less yesterday so didn't do much crafting but Dr. Hubby and I did finish watching the last few episodes of series 6 of Game of Thrones...very exciting!


Also very exciting of course is that we have a new challenge for you at In The Pink and our theme this time is...

WHAT'S NEW?
So, we want to see a card celebrating something new e.g. new baby, new home, or a card with some new stash on it
Don't forget we want to see more pink than any other colour!

Our fabulous sponsor this time is The Ribbon Girl 
They have generously provided this gorgeous paper pad as a prize for the winner; isn't that just sooooo pretty!


I have taken the opportunity to use some new stash so here we have a gorgeous new stamp and new lace on my card :-)

In contrast, the papers are very old ones that I just love with a little distressing to the edges.

Pink, floral, girly card featuring a cute fairy (image by Wee Stamps)

This cute little fairy comes with a friend in the same set so hopefully I'll have chance to use her soon too.

I've coloured her with Inktense pencils...under close scrutiny from some crafty friends - lol!

Pink, floral, girly card featuring a cute fairy (image by Wee Stamps)

Isn't that lace absolutely gorgeous?  The rest of the embellies are fairly standard for me and the tiny pink blobs are from a stamen cluster that I pulled apart!

Pink, floral, girly card featuring a cute fairy (image by Wee Stamps)

If you haven't already done so then do pop over to In The Pink and check out the gorgeous creations from the rest of the Pink Ladies.

Thanks for visiting and I really appreciate any comments that you leave,


Card recipe;
DP: Maja Design
Dies: Mini tags by Mama Elephant, Flower heart swirl - Magnolia Doohickeys

Inktense colours;
Skin: Baked earth, Madder brown, Saddle brown
Hair: Saddle brown, Oak, Sepia Ink
Dress: Carmine pink
Flowers: Shiraz, Sicilian yellow
Leaves: Light olive