
Hello lovely people,
Gosh, doesn't time fly?!
I intended to post this over the weekend but got carried away with other things...all good!
I hope you all had a lovely weekend whatever you were up to :-)
I have another stepper card to share with you and this time I have done a tutorial to go with it.
I am also showing off some lovely LOTV products on this card as part of the Design Collective.
So, first up I'll show you the finished card and then I'll get into the tutorial.

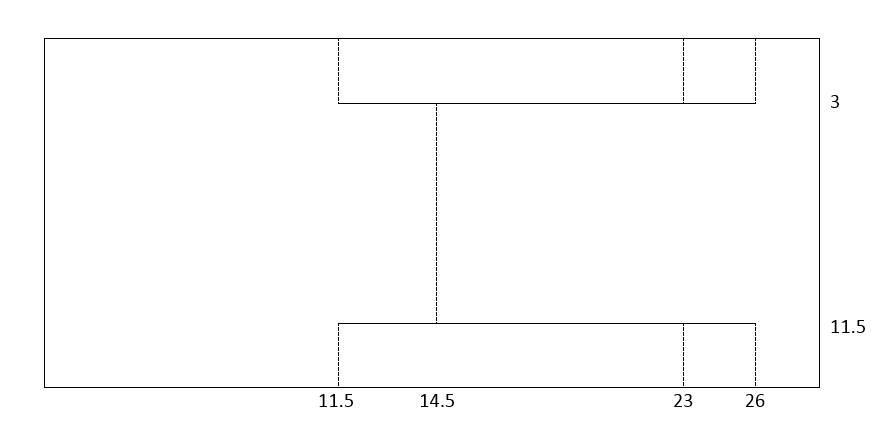
I started with a 14.5 x 29cm rectangle of card, and the picture below shows where I made the scores (dashed lines) and cuts (solid lines).
I always start by making little marks on all four edges of the back of the card (what will be the inside) at the indicated measurements on the picture.
Then I make the 2 cuts (the solid horizontal lines) with a craft knife and finally I score the other lines with a very ancient metal toothpick...but I guess any scoring tool that you have will be fine!
This method means that I cut and score exactly the bits that I need to and no more, so you end up with a nice complete back panel and no unsightly extra score lines.

I then gradually fold it up, starting with the middle fold and working down from there.
One of the folds (second from right hand side) is technically scored the 'wrong' way round for folding if you do all the score lines on the back, but I find it's a lot easier to score everything just on one side and just take care when folding it.
I sometimes like to get a little extra space on my central panel so for this design I cut a rectangle of white card and die cut the left and right hand sides, so the finished panel, as below, ended up about 11.5 x 13cm.

I cut rectangles of DP just slightly smaller than the side and bottom panels so a little white border is visible.
As usual, all the panels were inked and stitched.
I wrapped the bottom panel with twine before I attached it.
Now, I've been asked a few times how I attach twine and my main tip is just to fray the end of the twine first so it lays a bit flatter, then I simply tape it down!
Like so...

I then added the pink heart panel and image panel, sliding them under the twine. I had to be very specific about the order in which I added the layers and twine so I could get the twine on top of the image!

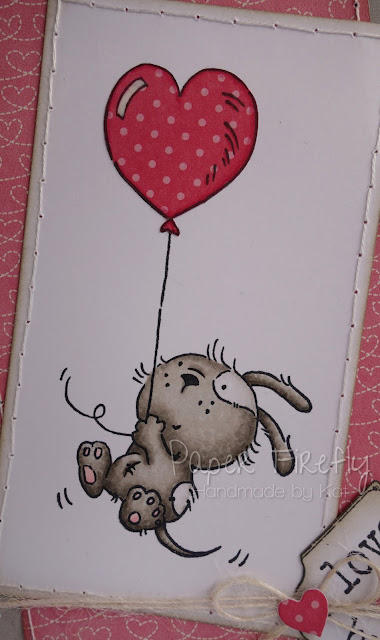
And I can't finish without a close up of the adorable dog, which Dr. Hubby says is entirely unrealistic because dogs don't have opposable thumbs so there is no way he could hold on to the balloon - lol!
I always start by making little marks on all four edges of the back of the card (what will be the inside) at the indicated measurements on the picture.
Then I make the 2 cuts (the solid horizontal lines) with a craft knife and finally I score the other lines with a very ancient metal toothpick...but I guess any scoring tool that you have will be fine!
This method means that I cut and score exactly the bits that I need to and no more, so you end up with a nice complete back panel and no unsightly extra score lines.
I then gradually fold it up, starting with the middle fold and working down from there.
One of the folds (second from right hand side) is technically scored the 'wrong' way round for folding if you do all the score lines on the back, but I find it's a lot easier to score everything just on one side and just take care when folding it.
I sometimes like to get a little extra space on my central panel so for this design I cut a rectangle of white card and die cut the left and right hand sides, so the finished panel, as below, ended up about 11.5 x 13cm.

I cut rectangles of DP just slightly smaller than the side and bottom panels so a little white border is visible.
As usual, all the panels were inked and stitched.
I wrapped the bottom panel with twine before I attached it.
Now, I've been asked a few times how I attach twine and my main tip is just to fray the end of the twine first so it lays a bit flatter, then I simply tape it down!
Like so...

I then added the pink heart panel and image panel, sliding them under the twine. I had to be very specific about the order in which I added the layers and twine so I could get the twine on top of the image!

And I can't finish without a close up of the adorable dog, which Dr. Hubby says is entirely unrealistic because dogs don't have opposable thumbs so there is no way he could hold on to the balloon - lol!

Card recipe;
Image: Odd Dog -Balloon - LOTV
DP: Yours truly - Pebbles
Tag: Sentiment tags - LOTV
Sentiment: For you circular sentiments - LOTV
Sentiment: Greetings postmarks - LOTV
Tag: Christmas sentiment tags - LOTV
Dies: Heart flower lace - Magnolia Doohickeys, Heart stems - Impression ObsessionSentiment: Greetings postmarks - LOTV
Tag: Christmas sentiment tags - LOTV
Sentiment:
Copic colours;
Dog: W1/2/3/4/5
Ligt patches on dog: W00/0/1
Shading on balloon: RV34 & blender
Dog: W1/2/3/4/5
Ligt patches on dog: W00/0/1
Shading on balloon: RV34 & blender
The stepper card is not the fanciest of fancy folds but it's one I really like and I hope some of you may find something of use in my tutorial, so thanks for reading :-)
Thanks for visiting and I really appreciate any comments that you leave,
Thanks for visiting and I really appreciate any comments that you leave,

Dear Kat, this is amazing, your card is truly beautiful and it is so typically generous of lovely you to do a tutorial to share you wonderful idea. Thank you
ReplyDeleteSue...xxx
Ooh!! This is fantastic...a perfect example of loveliness!! xx
ReplyDeleteSuch a pretty, pretty card! Love the red and gray color combination too. I've never tried to make a step card. Thanks for the tutorial. It's great.
ReplyDeleteLynn
This is great I love the image and thanks for a great tutorial x
ReplyDeleteSo gorgeous, love the image and colours
ReplyDeleteBeautiful. Cute image, lovely papers and a great tutorial.
ReplyDeleteDeborah A
Hi Kat
ReplyDeleteFabulous Stepper card...
Thanks for the Tutorial... Will give it a go...such a cute image...
Hugs Sylvie xx
Thanks for the wonderful tutorial, Kat. Loving your gorgeous card. You were so right about the LOTV trio stamps, I went in the afternoon of the 28th (my time) and the ones I loved were all sold :[ . Anyway, love this image, love your design!
ReplyDeleteThis is a beautiful card Kat, love the colours and thank you for the brilliant tutorial...I have never tried making my own steppers always use bought ones but I might even be brave enough to try now. That tip with the twine is inspired too lol simple but brilliant I would never have thought of that !
ReplyDeleteHugs, Kaz x
A very pretty stepper card Kat, love the colour combo and cute image you have used too. Your pretty die cut border really adds that extra appeal. I have just made a stepper card for my daughters birthday and wish I had seen this before, I would have added the border to mine.
ReplyDeleteLorraine
Hi Kat, another beautiful card. I love the simple colours and that front panel is so pretty. This is my favourite stamp of Odd Dog (lack of opposable thumbs not withstanding) :D
ReplyDeleteThanks for the tip on attaching twine, I never thought of spreading it out at the back.
Big hugs,
Katrina xx
Hiya Kat, hope you are well ? Time does fly far too quickly !!
ReplyDeleteThank you for the tutorial, i am rubbish at any kind of folds with cards but might give this one a go :)
The image is cute, lovely colouring as always.
Have a great day xxxx
What a gorgeous card Kat... as always, your colouring is perfect and I love how you paper pieced the balloon........... and those layers - so perfect! And then your stepper tutorial is brilliant - thanks for sharing!
ReplyDeleteBig hugs
Christine x
A fabulous card. Great tutorial. Really useful. I thought the tip about fraying the ends of twine is a really good one. X
ReplyDeleteHi Kat this is such a cute card! Thanks so much for the great tutorial. I have not made a stepper card in ages so your tutorial will come in really handy. Thanks for all your lovely comments you have left on my blog :)
ReplyDeleteHugs Lynsey x
Great tutorial and a great tip about fraying out the twine, I just tape mine so it's a bit more bulky. Fab card, and I reckon that the pup has the balloon string clasped between his two front paws so he doesn't need opposable thumbs, or maybe it's tied around his paw wrist (the right paw which you can't see!) Makes sense to me! LOL Love the paper piecing too.
ReplyDeleteLoved your tutorial Kat and your card is just gorgeous..
ReplyDeleteluv CHRISSYxx
This is adorable Kat, and thanks for the tutorial I keep saying I'm going to try something other than square cards.
ReplyDeleteAnne x
Oh this is fab Kat! Love the tutorial! Awesome to see your process hun. Gorgeous card, love the Magnolia lace edge. Gorgeous paper combo too. Love it! Hugs, Wends x
ReplyDeleteWell he is called "Odd Dog".....! Now we know why! I think I might need a 1-2-1 tutorial Kat! Will give your tutorial a go & hopefully it will all become clear as I go. Mum x
ReplyDeleteWell he is called "Odd Dog".....! Now we know why! I think I might need a 1-2-1 tutorial Kat! Will give your tutorial a go & hopefully it will all become clear as I go. Mum x
ReplyDelete