Thursday, 31 March 2016

Floral gift bags

Hello lovely people,

My currently running countdowns;

25 sleeps until holibobs!

19 sleeps until the final exams for my prescribing course!

1 sleep until our new car arrives!


And no more sleeps until the new challenge at In The Pink because it's here today and our theme this time is...

DIES/PUNCHES
Don't forget we want to see more pink than any other colour!

Our fabulous sponsor this time is Dies to Die For with a £10 voucher

I have made a little gift bag and although I made one like this before it was quite a while ago so I had to work out how to make it all over again!

I really wanted this version to have a little flap over the top, and decided to use a brad and piece of elastic to make the closure.

This seemed like a great idea until it came to attaching the elastic...uh oh!
I'm guessing a hot glue gun would have worked a treat but I don't have one of those so ended up using a very large blob of Glossy Accents, which worked a treat.

Small gift bag

I made a pair of these to fill with choklit eggs to give to some lovely friends as an Easter treat :-)

Small gift bag

Naturally I decorated the front with some pretty flowers and die cuts ;-)

Small gift bag


Bag recipe;
DP: available as digi download from Nitwit Collections
Tag: Sentiment tags - LOTV
Dies: heart swirl - Magnolia Doohickeys
Punch: Double dot scallop - Martha Stewart
Charm: Daisy chain - The Hobby House

If you haven't already done so then do pop over to In The Pink and check out the gorgeous creations from the rest of the Pink Ladies.

Thanks for visiting and I really appreciate any comments that you leave,


Wednesday, 30 March 2016

In fashion

Hello lovely people,

It's Creative Inspirations challenge time and we have the theme...

ANYTHING GOES +/- option of a sketch

You can use any of the sketches on the sketch page including this fab new sketch...


This time we are sponsored by the awesome KennyK Stamps with a prize of 3 digis of the winner's choice


I have used the Fashionista image from KennyK on a super simple design

CAS card using Fashionista from KennyK

Curly hair really is my colouring nemesis!
Actually, colouring anything is my nemesis at the moment; I seem to be having 'can't colour for toffee' strops fairly regularly but I'm sure (I hope!) normal service will be resumed soon.

CAS card using Fashionista from KennyK

The sentiment is from one of the new LOTV sets...and I just had to add a teeny bit of bling!

Sentiment from LOTV

Card recipe;
DP: Isabella - Bo Bunny
Sentiment: Teenage girl sentiments - LOTV
Gem: from stash

Copic colours;
Skin: E000/00/21/11/04 & R20
Hair: E53/57/59
Top / shoes / earrings: R81/83/85
Leggings: C6/7/9
Bangle: C0/3/5
Ground: C00/0/1/2/3/4

The DT have made some wonderful samples to inspire you so pop over to Creative Inspirations to take a look :-)

Thanks for visiting and I really appreciate any comments that you leave,


Thursday, 24 March 2016

Vintage layered wedding card

Hello lovely people,

Yes, I am still here!
Some of you may be forgiven for wondering where I have been and I'm sorry I haven't been visiting your blogs much of late but things are so hectic right now.
I have decided to stop beating myself up over it, get on track with everything else and hopefully I'll soon be able to get back to checking out all your lovely creations :-)

For now, it's time for a new challenge at As You Like It and our theme is...

YOUR FAVOURITE...LINE (from the bingo board)
...and don't forget to tell us why it's your favourite!

This is the board and I have chosen fussy & fancy, lace and pearls, which is probably no surprise because you know how much I love to layer up pretty papers and details :-)


Our sponsor this time is Wild Orchid Crafts with a £12 voucher


I chose a vintage style layered design which enabled me to use a few new bits of stash, starting with the gorgeous DP and one of my new scallop dies.
I really like the combination of shaped layers on this design.

Vintage style layered wedding card

The flowers are also new and are a fab (and flatter!) alternative to my beloved 3D flowers.

Vintage style layered wedding card


Card recipe;
Sentiment: Statements (congratulations) - LOTV
DP: Vintage wedding - Pion Design (available from Live and Love Crafts)
Lace: Faye - The Ribbon Girl (unavailable but Astrid is the same design in cream)
Dies: Large frilly frames #10 - Go Kreate, circle stax - MFT Die-namics, Large scalloped circles - Presscut, flowers (no name) - Joy! Crafts, Lavish branch - Memory Box, Beaded swirl flourish - Sue Wilson for Creative Expressions

I hope you will pop over to As You Like It and check out the fabulously creative projects from the rest of the team :-)

Thanks for visiting and I really appreciate any comments that you leave,


Thursday, 17 March 2016

Spring flowers

Hello lovely people,

Today is the day I have been waiting for....I'm off to the NEC with some fabulous crafting friends and I'm soooo excited!!


While I'm off buying new crafty goodies, eating cake and enjoying some lovely company, it's time for a new challenge at In The Pink and our theme is...

SPRING FLOWERS
Don't forget we want to see more pink than any other colour!

Our fabulous sponsor this time is The Ribbon Girl

I have made a simple easel design with my favourite Spring flower, hellebores.

Scalloped easel base card with hellebore art pad image and die cut butterflies

This image is from one of the few LOTV art pads I bought, which are now discontinued.
LOTV do have some fabulous new sentiments available to pre-order though...like the one on this card...just saying ;-)

Scalloped easel base card with hellebore art pad image and die cut butterflies

Card recipe;
Image: LOTV art pad (discontinued)
DP: Perfect Pair - available as digi download from Nitwit Collections
Dies: Leavenworth butterfly trio, Cascadia butterfly trio - Memory Box
Sentiment: Sketchy wishes - LOTV

If you haven't already done so then do pop over to In The Pink and check out the gorgeous creations from the rest of the Pink Ladies.

Thanks for visiting and I really appreciate any comments that you leave,


Wednesday, 16 March 2016

Triple layer flowers

Hello lovely people,

It's Creative Inspirations challenge time and we have the theme...

NATURE

Our sponsor this time is Petal Lu with an amazing offer of 30% off an order!

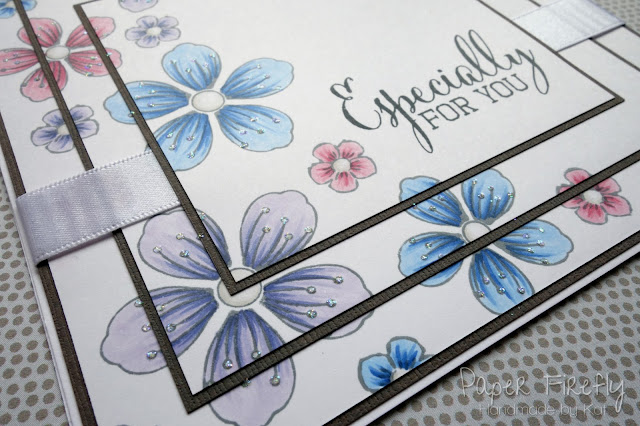
I really wanted to try out a new technique to me of triple layer stamping that I had seen in a recent card making magazine and since I didn't have a single large floral stamp, I used a selection of smaller flowers to make my design.

Triple layer stamped floral card


There were quite a few times in the making of this card I really wished I hadn't tried to do something new...

#1 - when the masking tape holding the layers together stuck too hard and nearly ripped my card

#2 - when I got a huge splat of Copic ink on the panels after colouring about 80% of the flowers  (yes, that's what the ribbon is hiding!)

#3 - when trying to line the panels back up after layering them onto the dark grey card

So, after all that I am not sure I like it, but I think that might just be down to the trauma of making it - lol!
It might grow on me!

And I do like the colouring with little dots of sparkle on the stamens...which is much better IRL than in the photos of course!

Triple layer stamped floral card


Card recipe;
Flowers: Spring flowers - Honey Doo Crafts plus tiny flower stamp from stash
Sentiment: Clearly Besotted
Ribbon: from stash
Sparkle: Stardust Stickles

Copic colours;
Pink flowers: R81/83/85
Purple flowers: BV000/01/04
Blue flowers: B21/23/26
Flower centres: W00/1

The DT have made some wonderful samples to inspire you so pop over to Creative Inspirations to take a look :-)

Thanks for visiting and I really appreciate any comments that you leave,


Sunday, 13 March 2016

New LOTV - Jasmine coffee

Hello lovely people,

I don't know about you, but I always find teenage cards tricky to make.

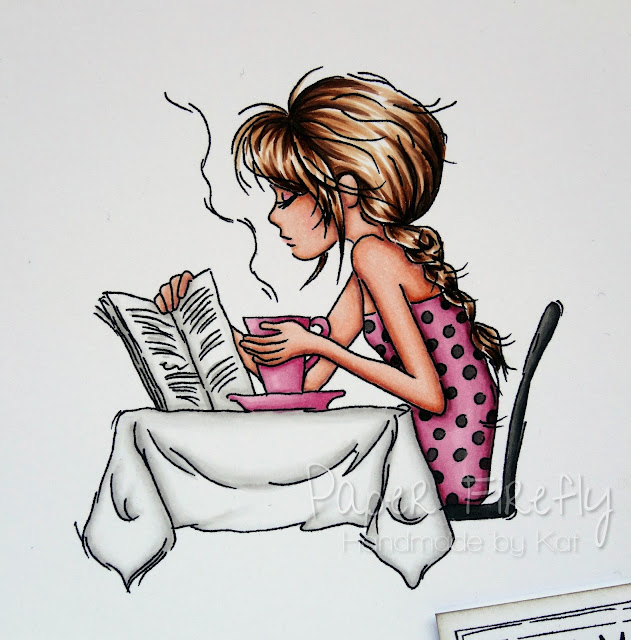
So I was delighted to find that LOTV have come to the rescue with an amazing new range of teenage images featuring Jasmine and Oliver - hurrah!

The images are out at the end of March but you can pre-order them right now and here's a card I made using one of the Jasmine images.

Girly card using LOTV stamp (Jasmine coffee)


Oooooh, I do love reading a book or magazine with a cup of coffee...never mind teenagers, this could definitely be me!

Girly card using LOTV stamp (Jasmine coffee)

I have also used one of the new sentiment stamps...there are so many gorgeous sets to choose from and this one's from the Teenage Girl set, which I think co-ordinates perfectly with the image :-)

I am really excited by the new sentiment stamp sets and think they are going to be really popular.  You are certainly going to be seeing them pop up on quite a few of my cards in the near future!

LOTV sentiment stamp (teenage girl stamp set)

Card recipe;
Image: Jasmine - coffee - LOTV
Sentiment: Teenage girl - LOTV
DP: from stash
Twine: Ivory button twine - The Ribbon Girl
White dots: Nuvo crystal drops (gloss white) - Tonic Studios

Copic colours;
Skin: E000/00/21/11/04 & R20
Hair: E53/57/59
Dress: RV11/R83/R56 & W7/9
Cup: RV11/R83
Tablecloth / magazine: W00/0/2
Chair: W6/7/9

I have had a great weekend and enjoyed all my catching up with friends.  Our walk on Saturday morning was really lovely, we watched a film in our cinema room, and I've done lots of crafting.
So pretty much a perfect weekend for me :-)

I hope you all had a fab weekend too!

Thanks for visiting and I really appreciate any comments that you leave,


Saturday, 12 March 2016

Cute cowgirl

Hello lovely people,

Happy weekend everyone!
I am going to be enjoying a fairly quiet weekend although I did pop out for a few drinks with friends last night and am having dinner with other friends tonight.

Today I have a Paper Nest Dolls card to share with you and this is one of a whole heap of brand new images that have just been released.

Cowgirl card; image from Paper Nest Dolls, papers by Maja Design


This is Cowgirl Emma and she is pretty cute but I think that little cow is even cuter!
Cowgirl card; image from Paper Nest Dolls, papers by Maja Design

I have to say I am always quite pleased when I make a girly card that doesn't feature pink!
Apart from that teeny heart - lol!

I do love to use twine on my cards and mostly go for button twine but this hemp twine is great for a slightly chunkier and less fluffy feel, which suits this image and card better I think.
Cowgirl card; image from Paper Nest Dolls, papers by Maja Design


Card recipe;
DP: Home for the Holidays - Maja Design (available from Live and Love Crafts)

Copic colours;
Skin: E000/00/21/11/04 & R20
Hair: Y21/YR23/E35
Hat / boots / belt: E23/25/27
Skirt / waistcoat / hat bow: B91/93/97
Shirt: W00/1
Rope: E40/41/42/43
Cow body: W00/1 & E31/33/35
Cow hair: E33/35/27
Cow feet: W0/1/3
Cow nose: R000/00/01
Cow horns: YR30
Ground: W00/0/1/2/3/4

It is the most beautiful sunny day here so Dr. Hubby and I are heading out for a walk before I settle in to do some crafting :-)

I hope you all have a wonderful weekend!

Thanks for visiting and I love reading any comments that you leave,


Thursday, 10 March 2016

Fairy with unicorn

Hello lovely people,

I've just completed the last 2 study days in Bath for my prescribing course and the next time I'm there it will be for the final assessments - eek!

So I think I deserve a few days of relaxation now and I have some exciting crafty things coming up soon that I can't talk about yet but will certainly keep me busy!

But now it's time for a new challenge at As You Like It


and our theme is...

YOUR FAVOURITE...type of embossing
...and don't forget to tell us why it's your favourite!

Our sponsor this time is Freckled Fawn with a $15 gift card


I don't use any form of embossing very much but when I do, it's always the Frantage that I reach for because it is so pretty and perfect for creating a magical feel.

Handmade card with fairy and unicorn (image from Polka Doodles)

I went back to my Copics to colour this lovely fairy and her unicorn, and added a few pearly dots around the image.

Handmade card with fairy and unicorn (image from Polka Doodles)


Card recipe;
DP: My precious daughter - Pion Design (available from Live and Love Crafts)
Dies: Fanciful trim - Sue Wilson for Creative Expressions
Charm - star charm - The Ribbon Girl
Embossing powder: Shabby white embossing enamel - Stampendous
Pearl dots: Nuvo crystal drops (neptune) - Tonic Studios

Copic colours;
Skin: E000/00/21/11/04 & R20
Hair: E53/35/59
Dress: BG72/75
Wings: BV0000/00/V20/22/25
Unicorn body: W00/0/1/2/3/4
Unicorn hair: V20/22/25

I hope you will pop over to As You Like It and check out the fabulously creative projects from the rest of the team :-)

I hope you are all well and I'm off to craft up a storm!

Thanks for visiting and I really appreciate any comments that you leave,


Monday, 7 March 2016

Spring fairy

Hello lovely people,

LOTV are currently running a fab Spring themed challenge on their facebook page and you can find all the details here.
There are some absolutely brilliant prizes on offer so do take a peek.
Here's my Design Collective card that I hope will inspire you to join in with the challenge.

Handmade card with Spring fairy (image from LOTV)


If you think the image is looking a little different to my usual it's because I've used my new Inktense pencils!
I still need a lot of practice but feel I have got the basic method of shading and I do really like the softer look than I can get with my Copics.

Handmade card with Spring fairy (image from LOTV)

I used a new die to create the little swirls and beaded sprays tucked among the flowers.
I don't think I would ever use this die all in one piece but it looks really lovely cut into smaller pieces.

Handmade card with Spring fairy (image from LOTV)


Card recipe;
Image: Petal - LOTV
DP: Vintage Spring - Maja Design (available from Live and Love Crafts)
Tag: Sentiment tags - LOTV
Dies: Large frames frilly #7 - Go Kreate, Tilda lace - Magnolia Doohickeys, Beaded swirl flourish - Sue Wilson for Creative Expressions

Inktense colours;
Skin: 0520/1800/1740
Hair: 1730/1740/2010
Dress / leaves: 1320
Wings: 0520
Flower: 0220/0240
Tights: 1720
Shoes: 2010

Thanks for visiting and I really appreciate any comments that you leave,


Thursday, 3 March 2016

Sew Special

Hello lovely people,

This week is fast getting away with me!  I like being busy but I feel like I'm keeping rather a lot of plates spinning at the moment.
So huge apologies for not being round to visit your blogs as much at the moment and I'll be popping round soon I hope.


Right now though we have a new challenge starting at In The Pink and our theme this time is...

SPECIAL LADY
Don't forget we want to see more pink than any other colour!

Our fabulous sponsor this time is Dies to Die For with a £10 voucher

I made this card for one of my sisters-in-law, who is fab with a sewing machine, and is of course, a special lady :-)

Of course I had to include my usual stitching on this card but thought I'd do a few variations on my usual straight line backstitch so I also did some wavy stitching and some zig zag stitching.

Handmade sewing themed card

I have a huge stash of buttons but totally ignored them in favour of these die cut versions because I just really like the Kraft card against the pretty papers.

Handmade sewing themed card

As you can see I managed to get a few more sewing themed bits and bobs on here with the scissors charm, pin and wooden cotton reel for the sentiment.

Handmade sewing themed card


Card recipe;
Image: retired digi image from Pink Petticoat
DP: available as digi download from Nitwit Collections

Copic colours;
Sewing machine body: W00/T0/1/2/3
Flowers: R81/83
Leaves: YG61/G43 & YR20/21


If you haven't already done so then do pop over to In The Pink and check out the gorgeous creations from the rest of the Pink Ladies.

Thanks for visiting and I really appreciate any comments that you leave,

Wednesday, 2 March 2016

Teacup stack

Hello lovely people,

I got totally carried away playing with my new Inktense pencils yesterday and nearly forgot to get this blog post ready...nearly!
I'm still learning how to use the pencils but hopefully will have something to show you soon :-)

While I get in some more practice with the pencils, it's Creative Inspirations challenge time and this fortnight we have the theme...

PRETTY PROJECTS

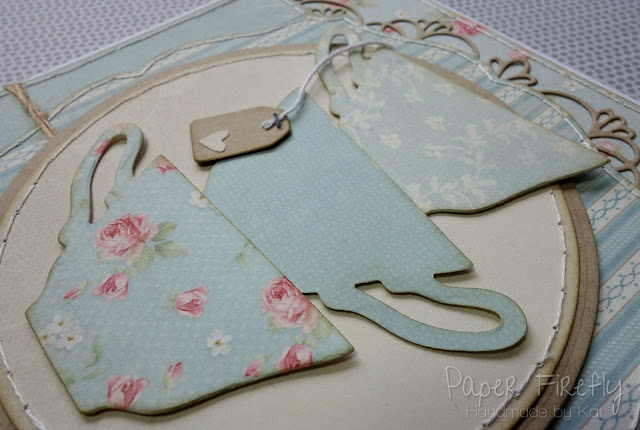
I hope you will agree that this combination of vintage style DP with my new teacup and lacy border dies is pretty!

Handmade card with stack of teacups (Stampin' Up dies)

I never normally flip dies over as they don't look as good with the 'wrong' side up, but this one actually looked fine and I liked the stack of cups with the handles pointing in different directions.

Handmade card with stack of teacups (Stampin' Up dies)

Card recipe;
DP: Paris Flea Market - Pion Designs (available from Live and Love Crafts)
Tag: Sentiment tags - LOTV
Dies: Large frilly frames #10 - Go Kreate, Circle stax - MFT Die-namics, Fanciful trim - Sue Wilson for Creative Expressions, Cups and kettle framelits - Stampin' Up!, Mini heart collection - Memory Box

The DT have made some wonderful samples to inspire you so pop over to Creative Inspirations to take a look :-)

Thanks for visiting and I really appreciate any comments that you leave,